

Paraffin Embedded Immunohistochemistry Protocol (IHC-P)

1. Introduction to Paraffin Embedded Immunohistochemistry (IHC-P)
Immunohistochemistry (IHC) is an extremely popular and powerful technique that allows the visualization of protein markers within thin sections of tissue. This can be used to analyze the distribution of receptors, look at the cellular makeup, expression of biomarkers and gross-morphology of a tissue amongst a myriad of other applications. Paraffin embedded immunohistochemistry (IHC-P) is a popular variation of IHC where tissue is embedded in paraffin wax following fixation. This better preserves tissue morphology, enables the cutting of extremely thin tissue sections and protects the tissue from degradation (paraffin embedded tissue is stable at room temperature for multiple years). There are two main variations of IHC-P:
- Chromogenic IHC-P: Primary antibodies are visualized by a colorimetric reaction catalysed by horseradish peroxidase that leads to the deposition of insoluble colored precipitates that can be seen using the naked eye and brightfield microscopy.
- Fluorescent IHC-P: Primary antibodies are visualized by fluorescently conjugated secondary antibodies that can be visualised using fluorescence microscopy.
Figure 1 shows some representative images of both chromogenic and fluorescent paraffin embedded immunohistochemistry that have been created using these protocols. The protocols within this guide are intended for paraffin embedded sections. We have created a whole separate guide for immunohistochemistry in fixed-frozen sections.
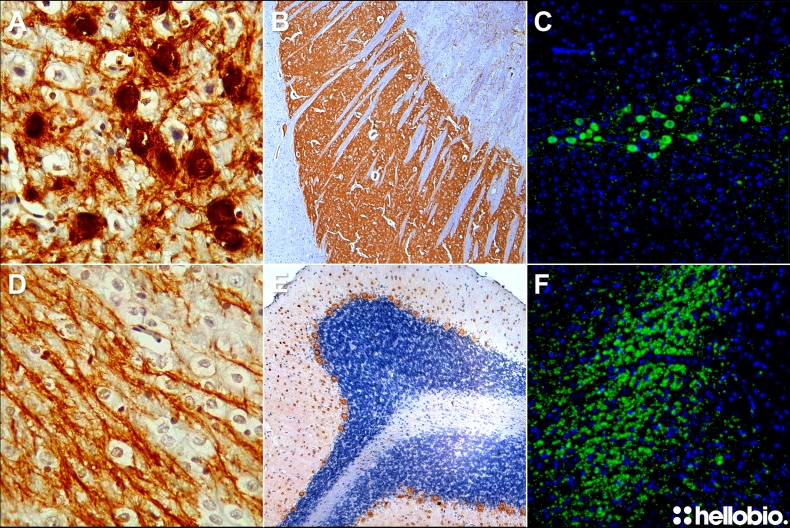
Figure 1. Representative paraffin embedded immunohistochemistry images created using the Hello Bio protocol. (A) Dopaminergic cell bodies in the midbrain stained using HB7167 and HB11345 antibodies via DAB staining. (B) Rat caudate putamen stained for tyrosine hydroxylase using HB7167 primary antibody and HB11345 secondary antibody utilizing DAB staining. (C) Immunofluorescent detection of dopaminergic midbrain cell bodies using HB6605. (D) Dopaminergic fibers projecting to the caudate putamen stained using HB7167 and HB11345 antibodies via DAB staining. (E) Parvalbumin neurons in the rat cerebellum stained using HB6457 and HB11345 antibodies via DAB staining. (F) Dopaminergic fibers in rat midbrain stained using HB6605 and a fluorescently tagged secondary antibody.
2. Safety
Many of the chemicals used in immunohistochemistry have dangerous properties and can cause serious harm if not handled correctly. Always follow local rules and read the full COSHH document for any chemical that you have not used previously. Always wear appropriate PPE such as a lab coat and gloves.
Specifically highlighted hazards:
- Formaldehyde is a highly toxic poison, skin sensitizer and carcinogen and should only ever be used in a fume hood with full PPE and disposed of safely following local regulations.
- Xylene is a volatile carcinogen, CNS depressant, and skin, eye and respiratory system irritant. It should only ever be used in a fume hood with full PPE and disposed of safely following local regulations.
3. Protocol - Fixation, Embedding and Sectioning
For high quality IHC-P results optimization of the fixation, embedding and sectioning process is crucial. A range of different fixatives can be used but the more common ones are 10% neutral buffered formalin (10% NBF), 4% paraformaldehyde and Bouin's solution. There are two main fixation methods: perfusion fixation where fixative is circulated using the animal's intact circulatory system or immersion fixation where dissected tissue is immersed in fixative.
3.1 Perfusion Fixation
Generally the best quality tissue sections are achieved when the animal has been perfusion-fixed. This process involved replacing the blood and it’s high autofluorescence with first buffer then fixative. Before attempting, make sure this is covered under your regulatory regime and obtain training from an experienced practitioner. A general protocol for rodents is:
1. Overdose with anesthetic by an appropriate route until the animal has no toe pinch and blink reflexes but the heart is still beating.
2. Open the ribcage to reveal the heart, snip the right atrium. Place a needle into the left ventricle and perfuse through ice-cold PBS (≈200ml for a rat, ≈15ml for a mouse) followed by a similar volume of 4% paraformaldehyde in PBS.
3. Remove the brain / other organs and place into a vial of 4% paraformaldehyde for 24hrs at 4°C.
4. Move the tissue into 70% ethanol before embedding
Please see Gage et al., 2012 J. Vis. Exp. (65), e3564 for a detailed protocol with accompanying video.
3.2 Immersion Fixation
Where perfusion fixation is not possible or practicable (e.g. for patient biopsy samples) then immersion fixation is a good alternative. The presence of blood within the tissue can however cause issues with background staining.
1. Dissect the tissue with clean tools on ice.
2. Wash briefly with ice-cold PBS
3. Place tissue into 4% paraformaldehyde in PBS for 24hrs at 4°C. The length of incubation in fixative often needs optimizing as under-fixation can result in edge staining while over-fixation can result in a low signal intensity or no signal at all. A good range of incubation times is between 18 and 24 hours for most tissue samples.
4. Move the tissue into 70% ethanol before embedding
3.3 Embedding and Sectioning
The final stage of tissue preparation is embedding and sectioning where the tissue is embedded into paraffin wax and then cut into sections of appropriate thickness.
- Perform paraffin embedding in an automated tissue processing system. Where this is not available then please follow this protocol for specific steps and incubation times.
- Following embedding, trim the tissue blocks and orientate in the desired direction on a microtome.
- Cut sections at a thickness between 3µm and 10µm (5µm is the most commonly cut thickness).
- Place cut sections into a water bath set at 45°C before then mounting onto microscope slides.
- Air dry sections for 30 minutes before incubating at 45°C overnight.
- Sections can now be stored at room temperature before further processing.
4. Protocol - Colorimetric Detection using Streptavidin HRP
Chromogen based immunohistochemistry utilizes enzyme conjugated streptavidin to catalyze a chemical reaction which results in the deposition of a colored precipitate. This is an extremely popular technique due to its high sensitivity, the high stability of the stained sections and the ease of imaging with simple widefield microscope systems. There are multiple chromogens available dependent upon experimental needs (see table 2 for a summary) in a range of different colors allowing a degree of multiplexing. This protocol has been optimized to use DAB staining however will work with other chromogens with minimal modification. Many of the wash and incubation stages in this protocol can be carried out in staining jars with slide racks to save time and allow more consistent staining across a batch. Following the successful completion of this protocol imaging can be carried out using a standard brightfield microscope using visible light.
|
Enzyme
|
Chromogen
|
Color
|
Recommended nuclear counterstain
|
Mounting Media
|
Description
|
|
Horseradish Peroxidase (HRP)
|
AEC
|
Red | Hematoxylin | Aqueous (e.g. glycerol jelly) | Intense color but not the best sensitivity |
| Brown | Hematoxylin | Organic (e.g. DPX) | Intense permanent color with medium sensitivity | ||
|
DAB with Ni2+ enhancer
|
Dark blue to black | Neutral Red | Organic | High sensitivity with intense permanent color | |
|
DAB with Co2+ enhancer
|
Dark blue | Neutral Red | Organic | High sensitivity with intense permanent color | |
| Blue | Hematoxylin | Aqueous | High sensitivity and intense permanent color | ||
|
4-CN
|
Dark blue to purple | Neutral Red | Aqueous | Low sensitivity with less permanent color | |
|
Alkaline Phosphatase (AP)
|
Blue | Neutral Red |
Organic | Intense color with good sensitivity | |
|
BCP/TNBT
|
Purple | Hematoxylin | Organic | Intense color with good sensitivity | |
|
Naphthol ASMXP + Fast Red
|
Orange to red | Hematoxylin | Aqueous | Medium intensity color that can fade easily | |
|
Naphthol ASMXP + Fast Blue
|
Blue | Hematoxylin | Aqueous | Medium intensity color that can fade easily. |
Figure 2. Chromogen options for paraffin embedded immunohistochemistry.
4.1 Deparaffinization
Before any antibody staining can happen it is crucial to remove the paraffin wax that the samples are embedded into to allow the penetration of buffers and antibodies.
- Incubate slides in either Histo-Clear or xylene for 20 minutes at room temperature
- Incubate slides in 100% ethanol for 3 minutes
- Incubate slides in 90% ethanol for 3 minutes
- Incubate slides in 70% ethanol for 3 minutes
- Leave sections in cold water until ready to proceed with staining.
4.2 Antigen Retrieval
Unlike immunohistochemistry using fixed frozen sections (see our frozen IHC protocol) antigen retrieval is essential for success using paraffin embedded sections. Two main buffers are used for IHC-P antigen retrieval: Citrate and Tris-EDTA. These can either be made in-house (see recipes for citrate and Tris-EDTA buffers) or purchased in a convenient concentrated format (see: HB7943 100X Tris-EDTA Buffer, pH9 and HB8687 10X Citrate buffer pH6). We carry out our antigen retrieval in a vegetable steamer although multiple other options are available including using a microwave, pressure cooker or autoclave (see Taylor et al., 1996 for a comparative study). There are a range of different antigen retrieval protocols available (see Krenacs et al., 2010 for a review) however this protocol forms a good foundation and can be then optimized if required:
- Set up the vegetable steamer so that there is a suitably sized heatproof container of citrate retrieval buffer contained within for the slides to antigen retrieve in. Preheat the steamer for 10-15 minutes (this can be carried out during the deparaffinization process)
- Place the slides in the citrate buffer and leave in the steamer for 20 minutes
- Remove the slides and run under cold tap water for 10 minutes.
4.3 Blocking and Staining
- Place slides in a humidified chamber and aspirate excess liquid. It is easy to make a homemade humidified chamber by soaking paper towels in water then placing them in an enclosed slide box with the slides.
- Draw around each tissue section with a PAP pen
- Wash slides twice for 5 minutes each with TBST
- Add 100μl of blocking buffer to each section (the volume can vary depending on the size of the tissue section) and incubate for 2 hours at room temperature
- Aspirate the blocking buffer and add primary antibody diluted (100μl per section) in antibody/streptavidin diluent then incubate overnight at 4°C. The concentration of primary antibody will need optimizing with manufacturers providing recommended dilutions. In the absence of any information a 1:500 dilution is a good starting point.
- Wash slides three times for 5 minutes each with TBST
- Incubate sections in 0.3% hydrogen peroxide in TBS for 15 minutes to block endogenous peroxidases. For Alkaline phosphatase conjugated secondary antibodies 2mM levamisole can be used instead.
- Wash slides twice for 5 minutes each with TBST
- Incubate sections (100μl / section) with biotinylated secondary antibody to the primary antibody species diluted in antibody/streptavidin diluent for 1 hour at room temperature with gentle agitation. A dilution of 1:300 works well for this stage.
- Wash slides three times for 5 minutes each with TBST
- Incubate sections (100μl / section) with HRP conjugated streptavidin diluted in antibody/streptavidin diluent for 30 minutes at room temperature with gentle agitation. A dilution of 1:500 works well for this stage.
- Wash slides three times for 5 minutes each with TBST. Meanwhile make the DAB Staining Solution.
- Add 100μl of DAB Staining Solution to each section and incubate for 10 minutes. This development time can be extended or shortened dependent upon the progression of the staining reaction.
- Rinse slides in running tap water for 5 minutes.
4.4 Counterstaining, Dehydration and Mounting
- Incubate in hematoxylin solution for 5 minutes (available preformulated as HB6189 - Modified Mayer's Hematoxylin)
- Rinse slides in running tap water for 5 minutes
- Dip sections quickly 8-12 times in acid alcohol
- Incubate sections for 2 minutes in tap water
- Incubate sections for 2 minutes in Scott's water
- Dip and quickly swish sections in 70% ethanol, then 90% ethanol then leave the sections in 100% ethanol for 3 minutes
- Incubate sections in three changes of xylene in the fume hood. You can keep and reuse these xylene washes but make sure to label them from clean to dirty and always use them in the same order.
- Add a couple of drops of a mounting media like DPX to each slide then gently place a coverslip being careful to remove all bubbles. This can be done by gently pressing bubbles with a pipette tip until they leave the slide.
- Leave slides in the fume hood overnight for the mounting media to cure.
5. Protocol - Fluorescent Detection
Fluorescence based immunohistochemistry utilizes fluorophore conjugated secondary antibodies (or streptavidin) for visualization of target proteins. Immunofluorescence is ideal for multiplexing due to the wide variety of fluorophores available (see our guide on choosing a secondary antibody) and additionally is a shorter protocol than colorimetric IHC-P. Due to the ability to easily multiplex fluorescent detection is ideal where there is a need to colocalize two proteins as the different fluorophores provide a clean signal within their channel and minimal overlap. Many of the wash and incubation stages in this protocol can be carried out in staining jars with slide racks to save time and allow more consistent staining across a batch. Following the successful completion of this protocol imaging can be carried out using either a standard widefield fluorescence microscope or a confocal laser scanning microscope.
5.1 Deparaffinization
Before any antibody staining can happen it is crucial to remove the paraffin wax that the samples are embedded into to allow the penetration of buffers and antibodies.
- Incubate slides in either Histo-Clear or xylene for 20 minutes at room temperature
- Incubate slides in 100% ethanol for 3 minutes
- Incubate slides in 90% ethanol for 3 minutes
- Incubate slides in 70% ethanol for 3 minutes
- Leave sections in cold water until ready to proceed with staining.
5.2 Antigen Retrieval
Unlike immunohistochemistry using fixed frozen sections (see our frozen IHC protocol) antigen retrieval is essential for success using paraffin embedded sections. Two main buffers are used for IHC-P antigen retrieval: Citrate and Tris-EDTA. These can either be made in-house (see recipes for citrate and Tris-EDTA buffers) or purchased in a convenient concentrated format (see: HB7943 100X Tris-EDTA Buffer, pH9 and HB8687 10X Citrate buffer pH6). We carry out our antigen retrieval in a vegetable steamer although multiple other options are available including using a microwave, pressure cooker or autoclave (see Taylor et al., 1996 for a comparative study). There are a range of different antigen retrieval protocols available (see Krenacs et al., 2010 for a review) however this protocol forms a good foundation and can be then optimized if required:
- Set up the vegetable steamer so that there is a suitably sized heatproof container of citrate retrieval buffer contained within for the slides to antigen retrieve in. Preheat the steamer for 10-15 minutes (this can be carried out during the deparaffinization process)
- Place the slides in the citrate buffer and leave in the steamer for 20 minutes
- Remove the slides and run under cold tap water for 10 minutes.
5.3 Blocking and Staining
- Place slides in a humidified chamber and aspirate excess liquid. It is easy to make a homemade humidified chamber by soaking paper towels in water then placing them in an enclosed slide box with the slides.
- Draw around each tissue section with a PAP pen
- Wash slides twice for 5 minutes each with TBST
- Add 100μl of blocking buffer to each section (the volume can vary depending on the size of the tissue section) and incubate for 2 hours at room temperature
- Aspirate the blocking buffer and add primary antibody diluted (100μl per section) in antibody/streptavidin diluent then incubate overnight at 4°C. The concentration of primary antibody will need optimizing with manufacturers providing recommended dilutions. In the absence of any information a 1:500 dilution is a good starting point.
- Wash slides three times for 5 minutes each with TBST
From now onwards protect the sections from light
- Incubate sections (100μl / section) with fluorophore conjugated secondary antibody to the primary antibody species diluted in antibody/streptavidin diluent for 90 minutes at room temperature with gentle agitation. A dilution of 1:300 works well for this stage.
- Wash slides two times for 5 minutes each with TBST
- Incubate sections with 1µg/ml DAPI for 10 minutes at room temperature (100μl / section)
- Wash slides for 5 minutes with TBST
- Add 100μl / section of 0.1% Sudan black and incubate for 5 minutes
- Wash slides three times for 5 minutes each with TBS
- Aspirate all liquid from the slide then add a drop of mounting media before gently adding a coverslip. If using an aqueous mounting media then application of clear nail varnish round the edge of the slide will be required to seal the section.
6. Solutions and Recipes
We have detailed all the recipes you should need to successfully complete IHC-P experiments in this section. Please follow the links below to each recipe:
10x PBS
Note: store at room temperature
|
Reagent |
Amount to add |
Final concentration |
||
|
500ml |
1000ml |
2000ml |
||
|
NaCl |
40g |
80g |
160g |
1.37M |
|
KCl |
1g |
2g |
4g |
27mM |
|
Na2HPO4 |
7.2g |
14.4g |
28.8g |
100mM |
|
KH2PO4 |
1.2g |
2.4g |
4.8g |
20mM |
|
dH2O |
≈400ml |
≈800ml |
≈1600ml |
- |
|
Conc HCl |
Adjust to pH 7.4 |
- |
||
|
dH2O |
Make up to final volume required |
- |
||
10x TBS
Note: store at room temperature
-
Reagent
Amount to add
Final concentration
500ml
1000ml
2000ml
NaCl
40g
80g
160g
1.37M
Tris-base
12.1g
24.2g
48.5g
200mM
dH2O
≈400ml
≈800ml
≈1600ml
-
Conc HCl
Adjust to pH 7.4
-
dH2O
Make up to final volume required
-
1x PBST / TBST
Notes:
- Tween20 is extremely viscous therefore it is often helpful to cut the end off the pipette tip using scissors to made pipetting easier.
- The solution will need a good mixing with a stirring bar before being ready to use
- Generally make up fresh and don’t keep for longer than a few days.
|
Reagent |
Amount to add |
Final concentration |
||
|
500ml |
1000ml |
2000ml |
||
|
10x TBS / PBS |
50ml |
100ml |
200ml |
1x |
|
dH2O |
450ml |
900ml |
1800ml |
- |
|
Tween20 |
0.5ml |
1ml |
2ml |
0.1% |
Sodium Citrate Antigen Retrieval Buffer
Notes:
- Tween20 is extremely viscous therefore it is often helpful to cut the end off the pipette tip using scissors to made pipetting easier.
- The solution will need a good mixing with a stirring bar before being ready to use
- Store at room temperature
|
Reagent |
Amount to add |
Final concentration |
||
|
500ml |
1000ml |
2000ml |
||
|
Tris-sodium citrate dihydrate |
1.47g |
2.94g |
5.88g |
10mM |
|
dH2O |
≈450ml |
≈900ml |
≈1800ml |
- |
|
Tween20 |
0.25ml |
0.5ml |
1ml |
0.05% |
|
Conc. HCl |
Adjust to pH6 |
- |
||
|
dH2O |
Make up to final volume required |
- |
||
Tris-EDTA Antigen Retrieval Buffer
Notes:
- Tween20 is extremely viscous therefore it is often helpful to cut the end off the pipette tip using scissors to made pipetting easier.
- The solution will need a good mixing with a stirring bar before being ready to use
- Store at room temperature
|
Reagent |
Amount to add |
Final concentration |
||
|
500ml |
1000ml |
2000ml |
||
|
Tris base |
0.61g |
1.21g |
2.42g |
10mM |
|
EDTA |
0.19g |
0.37g |
0.74g |
1mM |
|
dH2O |
≈450ml |
≈900ml |
≈1800ml |
- |
|
Tween20 |
0.25ml |
0.5ml |
1ml |
0.05% |
|
Conc. HCl |
Adjust to pH9.0 |
- |
||
|
dH2O |
Make up to final volume required |
- |
||
Blocking Buffer
Notes:
- Make up fresh
- For best results use serum from the same animal as the secondary antibody host.
|
Reagent |
Amount to add |
Final concentration |
||
|
5ml |
10ml |
50ml |
||
|
Normal serum (e.g. goat) |
0.5ml | 1ml | 5ml | 10% |
|
Bovine serum albumin (BSA) |
0.05g | 0.1g | 0.5g | 1% |
|
TBST / PBST |
5ml | 10ml | 50ml | - |
Antibody/Streptavidin Diluent
Notes:
- Make up fresh
- Also available to purchase as HB8223 - Antibody Diluent
|
Reagent |
Amount to add |
Final concentration |
||
|
5ml |
10ml |
50ml |
||
|
Bovine Serum Albumin (BSA) |
0.05g | 0.1g | 0.5g |
1% |
|
TBST / PBST |
5ml | 10ml | 50ml |
- |
70% Ethanol
Note: Store at room temperature
|
Reagent |
Amount to add |
Final concentration |
||
|
100ml |
250ml |
1000ml |
||
|
Ethanol |
70ml | 175ml | 700ml |
70% |
|
dH2O |
30ml | 75ml | 300ml |
- |
90% Ethanol
Note: Store at room temperature
|
Reagent |
Amount to add |
Final concentration |
||
|
100ml |
250ml |
1000ml |
||
|
Ethanol |
90ml | 225ml | 900ml | 90% |
|
dH2O |
10ml | 25ml | 100ml | - |
Acid Alcohol
Note: Store at room temperature
|
Reagent |
Amount to add |
Final concentration |
||
|
50ml |
250ml |
1000ml |
||
| Ethanol | 35ml | 175ml | 700ml | 70% |
| dH2O | 15ml | 75ml | 300ml | 30% |
| 10M HCl | 125μl | 625μl | 2.5ml | 25mM |
Scott's Water
Note: Store at room temperature
|
Reagent |
Amount to add |
Final concentration |
||
|
50ml |
250ml |
1000ml |
||
| MgSO₄ | 0.5g | 2.5g | 10g | 83mM |
| NaHCO₃ | 0.033g | 0.165g | 0.66g | 7.85mM |
| dH2O | 50ml | 250ml | 1000ml | - |
1% DAB
Notes:
- Ensure that the solution changes color to a light brown before then mixing for a further 10 minutes to ensure the DAB is fully dissolved.
- Aliquot and store at -20°C
|
Reagent |
Amount to add |
Final concentration |
||
|
10ml |
50ml |
100ml |
||
| 3,3-Diaminobenzidine (DAB) tetrahydrochloride (HB0687) | 0.1g | 0.5g | 1g | 1% |
| dH2O | 10ml | 50ml | 100ml | - |
| 10M HCl | 3-5 drops | 15 - 25 drops | 30 - 50 drops | - |
0.3% Hydrogen Peroxide
Notes:
- Make fresh as dilute hydrogen peroxide is not very stable.
- Use distilled water for making the DAB working solution and TBS for quenching endogenous peroxidases.
|
Reagent |
Amount to add |
Final concentration |
||
|
10ml |
50ml |
100ml |
||
| 30% Hydrogen Peroxide | 0.1ml | 0.5ml | 1ml | 0.3% |
| dH2O / TBS | 10ml | 50ml | 100ml | - |
DAB Staining Solution
Note: Make up fresh just before use
|
Reagent |
Amount to add |
Final concentration |
||
|
5ml |
10ml |
50ml |
||
| PBS / TBS | 4.5ml | 9ml | 45ml | - |
| 1% DAB | 0.25ml | 0.5ml | 2.5ml | 0.05% |
| 0.3% Hydrogen Peroxide | 0.25ml | 0.5ml | 2.5ml | 0.015% |
0.1% Sudan Black
Note: Store at room temperature
|
Reagent |
Amount to add |
Final concentration |
||
|
10ml |
50ml |
100ml |
||
| Sudan Black | 10mg | 50mg | 100mg | 0.1% |
| Ethanol | 7ml | 35ml | 70ml | 70% |
| Distilled water | 3ml | 15ml | 30ml | 30% |
DAPI Staining Solution (1µg/ml)
Note: Aliquot and store at -20°C. Protect from light.
|
Reagent |
Amount to add |
Final concentration |
||
|
5ml |
10ml |
50ml |
||
| DAPI (1mg/ml) - HB8199 | 5µl | 10µl | 50µl | 1µg/ml |
| TBS | 5ml | 10ml | 50ml | - |
7. Troubleshooting
Immunohistochemistry is a long multi-step process with many things that can go wrong and numerous factors that should be considered for a successful experiment. At some point it is inevitable that something will go wrong or not be optimal. Below are compiled some of the most common pitfalls that can cause sub-optimal immunohistochemistry results.
|
Problem |
Potential cause |
Suggested solutions |
|
|
Weak or no staining
|
Too low antibody concentration |
|
|
|
Antibody incompatibility |
|
||
|
High background is obscuring signal |
|
||
|
Antibody is not suitable for IHC-P |
|
||
|
Low abundance of target protein |
|
||
|
Fixation may be obscuring the target epitope |
|
||
|
Poor antibody penetration into tissue section |
|
||
|
Incompatible secondary fluorophores used with detection system (Fluorescent IHC-P only) |
|
||
|
Degradation of fluorophore following mounting (Fluorescent IHC-P only) |
|
||
|
Degraded buffers |
|
||
|
Degraded primary antibody |
|
||
|
Damaged fluorophore conjugated secondaries due to light bleaching |
|
||
|
Incompatible buffers |
|
||
|
Insufficient chromogen development (Colorimetric IHC-P only) |
|
||
|
Insufficient sensitivity of chromogen (Colorimetric IHC-P only) |
|
||
|
Over-fixation |
|
||
|
Bleed through between channels when multiplexing (Fluorescent IHC-P only) |
Overlapping fluorophore excitation/emission spectra (Fluorescent IHC-P only) |
|
|
|
Unsuitable excitation and emission filters on imaging system (Fluorescent IHC-P only) |
|
||
|
Altered tissue morphology |
Incomplete fixation |
|
|
|
High background or non-specific staining
|
Auto fluorescent molecules in tissue section (Fluorescent IHC-P only) |
|
|
|
Non-specific secondary binding |
|
||
|
Too high primary antibody concentration |
|
||
|
Too high secondary antibody concentration |
|
||
|
Too high streptavidin HRP concentration (Colorimetric IHC-P only) |
|
||
|
Too long chromogen development (Colorimetric IHC-P only) |
|
||
|
Insufficient purification of antibodies |
|
||
|
Insufficient blocking |
|
||
|
Insufficient washing |
|
||
|
Primary antibody is from the same species as the tissue sections. |
|
||
|
Endogenous enzyme activity (Colorimetric IHC-P only) |
For HRP conjugated secondaries use 0.3% H2O2 for 10-15 minutes. If blocking is not successful at this concentration consider increasing to 3%. For AP conjugated secondaries use 2mM levamisole.
|
||
|
Sections have dried out |
|
||
|
Thickness of tissue section |
|
||
8. Further Reading
- Muniz Partida C, Walters E. A novel immunohistochemical protocol for paraffin embedded tissue sections using free-floating techniques. Front Neuroanat. 2023
- Zaqout S, Becker LL, Kaindl AM. Immunofluorescence Staining of Paraffin Sections Step by Step. Front Neuroanat. 2020
- Shi SR, Liu C, Taylor CR. Standardization of immunohistochemistry for formalin-fixed, paraffin-embedded tissue sections based on the antigen-retrieval technique: from experiments to hypothesis. J Histochem Cytochem. 2007
- Syrbu SI, Cohen MB. An enhanced antigen-retrieval protocol for immunohistochemical staining of formalin-fixed, paraffin-embedded tissues. Methods Mol Biol. 2011
- Grillo F, Bruzzone M, Pigozzi S, Prosapio S, Migliora P, Fiocca R, Mastracci L. Immunohistochemistry on old archival paraffin blocks: is there an expiry date? J Clin Pathol. 2017
- Kim SW, Roh J, Park CS. Immunohistochemistry for Pathologists: Protocols, Pitfalls, and Tips. J Pathol Transl Med. 2016
- Magaki S, Hojat SA, Wei B, So A, Yong WH. An Introduction to the Performance of Immunohistochemistry. Methods Mol Biol. 2019