

Immunocytochemistry (ICC) Protocol
This step by step protocol provides everything you need to carry out successful immunocytochemistry. Written by our PhD qualified expert antibody team, this protocol includes help with making key decisions, protocol techniques, and safety considerations, as well as recipes for all the solutions you will need, and a troubleshooting guide.
Contents
|
 |
1. Introduction to Immunocytochemistry (ICC)
Immunocytochemistry is a type of immunofluorescence technique in which antibodies are used to label cells directly upon either a microscope slide or coverslip. Adherent cells can either be grown directly on coverslips or cells in suspension can be pipetted onto a coverslip to proceed with the straining process. Figure 1 shows some example images that have been achieved following the protocols detailed within this guide.
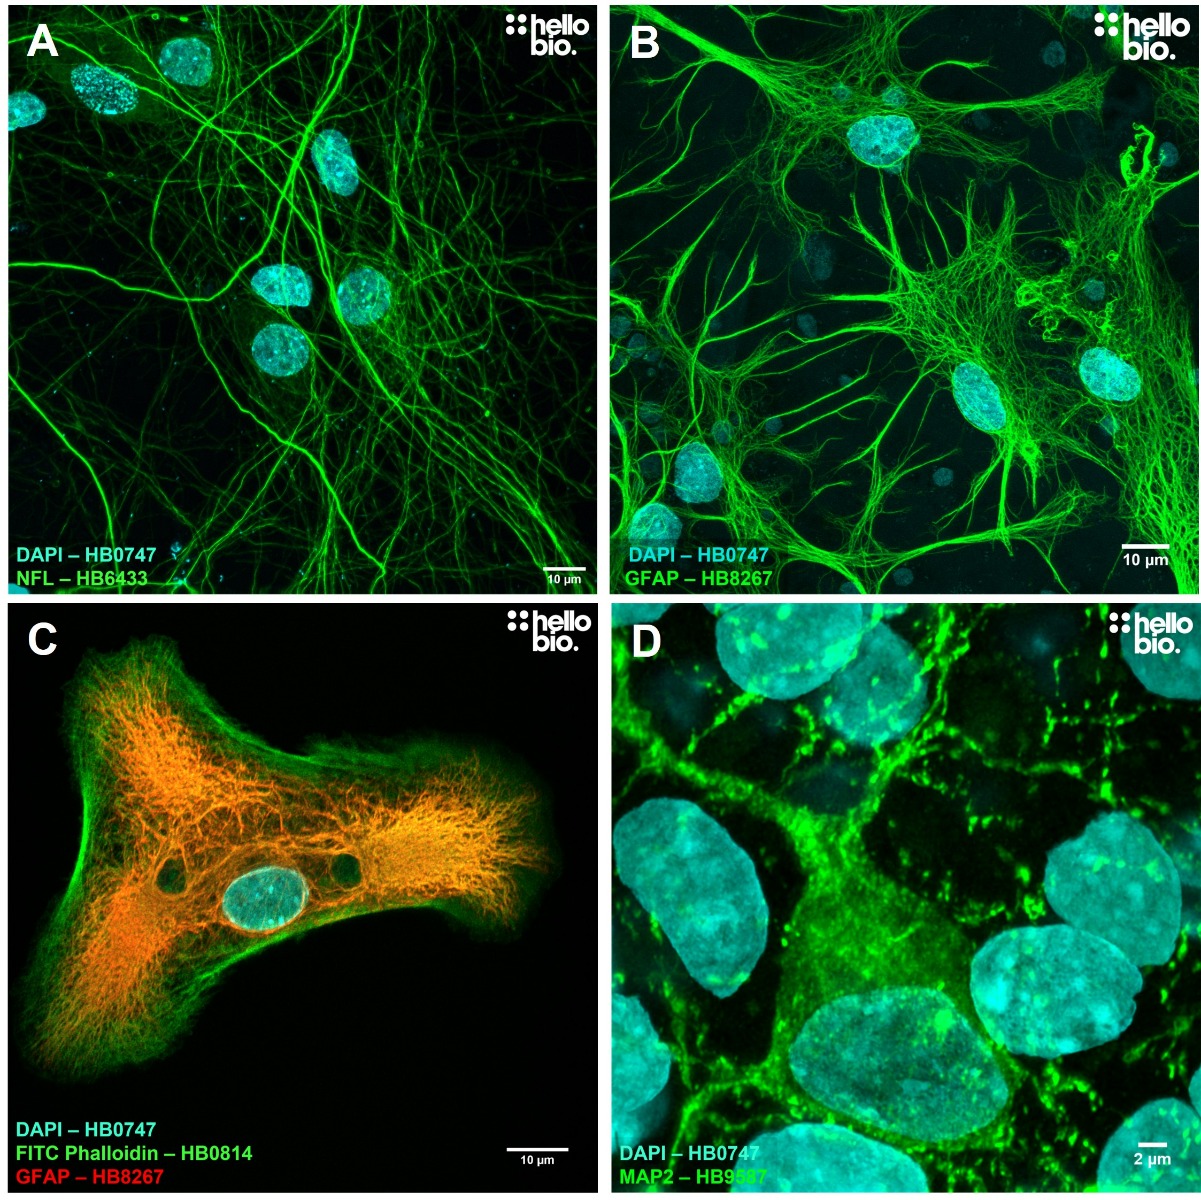
Figure 1. Example ICC images from cultured rat neurones using Hello Bio antibodies. A Neurofilament L (HB6433) staining reveals the dense cytoskeletal network of cultured neurones. B and C GFAP staining (HB8267) of astrocytes with FITC Phalloidin (HB0814) in C additionally being used to label actin filaments. D MAP2 staining (HB9587) reveals the cell body and processes of a cultured neurone. In all images DAPI (HB0747) is used to reveal cell nuclei.
2. Key Decisions
Before starting any immunocytochemistry it is important to consider the following points:
- Is it necessary to use an isotype control or will a no-primary replicate provide sufficient confidence that any staining seen is genuine (see section 2.1).
- What fixative will provide the best staining while also preserving structural morphology (see section 2.2).
- Whether to permeabilise the cells or not (see section 2.3)
- Whether antigen retrieval is necessary (see section 4.3)
- Which fluorophore combinations should be used for optimal signal (see section 2.4)
2.1 Isotype controls
2.1.1 What are isotype controls?
Isotype controls are antibodies with no antigen specificity which are used in immunochemical experiments to control for non-specific interactions between antibodies and the sample. They are most commonly used in flow cytometry, immunohistochemistry and immunocytochemistry experiments where they are particularly useful due to the often high background staining levels. Background staining can be caused by many factors including:
- Binding of antibodies to Fc receptors on target cells. For example some antibodies (e.g. mouse IgG2a) bind to Fc receptors on human leukocytes independently of the primary antibody – antigen interaction.
- Cellular autofluorescence. Some cells and cellular structures contain either proteins or chemicals which naturally fluoresce and this can lead to background staining.
- Non-specific antibody interactions. The primary antibody may bind to non-intended targets meaning that the isotype control can be key in determining if this has occurred.
2.1.2 How to choose an isotype control
When choosing an isotype control it is important to bear in mind:
- The host species should be the same as that of the primary antibody
- The isotype (e.g. IgG2a, IgG1) should be the same as the primary antibody
- The isotype control should have the same modifications as the primary antibody (e.g. if the primary is biotinylated so should the isotype control).
2.1.3 How to use Isotype controls
When isotype controls are included in an experiment they should always be used at the same concentration as the primary and following an identical protocol. Ideally the isotype control should generate minimal staining, indicating that there is minimal background staining. However this does not prove that the primary antibody is binding specifically!
2.2 How to choose a fixative
Fixation prevents degradation of the sample alongside helping to maintain cellular structures to enable crisp images. Two methods are most commonly employed: methanol and paraformaldehyde. Fixation can however cause artefacts and interfere with detection of certain epitopes therefore it is important to consider which is the best fixative to use for each experiment.
| Blocking solution | Recipe | Mechanism | Advantages | Disadvantages |
| Methanol | 100% methanol (-20ºC) |
Causes precipitation of cellular proteins |
Good when epitope is masked by PFA fixation. |
Some antibody epitopes may be made inaccessible by precipitation. May change membrane protein structure as dissolves lipids. Causes cell shrinkage and structural changes Not recommended for overexpressed fluorescent proteins |
| Para-formaldehyde (PFA) | 4% PFA in PBS | Causes protein cross-linking via free amine groups |
Excellent preservation of morphology Recommended standard fixative |
Some antibody epitopes may be modified by cross-linking
|
2.3 When to permeabilise
Antibodies are large protein structures therefore are unable to transit the plasma membrane. Dependent upon whether the target protein is intra-cellular or extracellular it may be necessary to permeabilise the cells to allow antibodies to cross the cell membrane and access the epitope.
 |
Permeabilise |
Intracellular proteins |
 |
Don’t permeabilise |
Membrane proteins where the antibody epitope is on the extracellular side of the membrane |
2.4 Choosing secondary antibody fluorophores
It is important to choose secondary antibodies that have conjugated fluorophores that are sufficiently separated from each other in excitation/emission wavelengths. If there is too much overlap between spectra then each channel can bleed into each other meaning that it isn’t possible to determine which signal comes from which antibody. In order to determine the best fluorophores to use:
- Determine the compatibility of the microscope system you are planning on using with available fluorophores. Widefield microscopes will commonly be fitted with filter sets which are only compatible with limited numbers of fluorophores. Confocal microscopes are able to use a much wider range of fluorophores will still be limited by the wavelengths of the installed lasers.
- Use a spectral viewer tool to check compatibility between various fluorophores.
A preference should be towards using standard combinations e.g. DAPI and a fluorophore emitting in the green spectrum (e.g. Alexa Fluor 488, Dylight 488, Janelia Fluor 488, FITC)
3. Equipment and consumables
Assuming a base level of standard laboratory equipment (e.g. pipettes, de-ionised water system, measuring cylinders etc) the specific equipment and consumables required for immunocytochemistry are detailed within this section. A suitable imaging system is also needed for detection of fluorescently labelled cells with both widefield and confocal systems producing excellent images suitable for publication.
| Equipment | Consumables |
|
Rocker Cold room or fridge
Cell culture plates
|
PBS containing 0.1% Triton X-100 PBS-T Blocking solution Primary antibody Secondary antibody BSA Mounting medium Clear nail varnish (if not using a hardset mounting medium) Optional: Antigen retrieval buffer |
Protocol
4.1 Safety
Many of the chemicals used in immunocytochemistry have dangerous properties and can cause serious harm if not handled correctly. Always follow local rules and read the full COSHH document for any chemical that you have not used previously. Always wear appropriate PPE such as a lab coat and gloves.
Specifically highlighted hazards:
- Methanol is highly flammable and toxic leading to blindness and kidney failure. Avoid breathing methanol vapors and avoid skin contact.
- Formaldehyde is a highly toxic poison, skin sensitizer and carcinogen and should only ever be used in a fume hood with full PPE.
4.2 Fixation
Fixation is the first stage in any immunocytochemistry protocol. Remove the cells from the incubator and optionally wash 3 times with ice-cold PBS. This step removes debris however if cells are poorly adhered can cause them to detach. If cells are poorly adherent omit this step.
| PFA | Methanol |
|
1. Incubate cells in 4% PFA in PBS (pH7.4) for 10 minutes at room temperature in a fume hood. 2. Wash cells three times (5 minutes per wash) with ice-cold PBS |
1. Incubate cells in chilled 100% methanol (-20ºC) at room temperature for 5 minutes. 2. Wash once with PBS |
4.3 Antigen Retrieval (optional)
Fixation with formaldehyde based fixatives causes cross-linking of proteins which may obscure the epitope in the target protein therefore inhibiting antibody binding. Antigen retrieval aims to help re-expose the epitope to allow antibody binding however can cause damage to the morphology of cells.
![]() Important: Antigen retrieval is an optional step and should only be done if previous attempts have not been successful or if the antibody vendor recommends use of antigen retrieval.
Important: Antigen retrieval is an optional step and should only be done if previous attempts have not been successful or if the antibody vendor recommends use of antigen retrieval.
1. Preheat antigen retrieval buffer (100 mM Tris, 5% [w/v] urea, pH 9.5) to 95°C in a cover glass staining jar.
2. Place the coverslips in the antigen retrieval buffer for 10 minutes, maintaining the temperature at 95°C, contained within staining jar making sure that the side cells are on is always facing a consistent direction.
3. Remove the coverslips from the cover glass staining jar and return then to a 6-well culture plate making sure that the side with cells is always facing up.
4. Wash coverslips in PBS three times for 5 minutes per wash.
4.4 Permeabilisation
If permeabilisation is desired (see section 2.3) then proceed as follows:
1. Incubate the coverslips in PBS containing 0.1% Triton X-100 for 10 minutes.
a. This is a good starting point but may need optimizing if permeabilisation is too extensive or too poor.
i. Triton can be used in a range of 0.1 to 0.25% while other detergents such as Tween20 are less aggressive and can be used if permeabilisation is too high.
2. Wash cells in PBS three times for 5 minutes per wash.
4.5 Immunofluorescent staining
1. Incubate coverslips in blocking solution for 30 minutes at room temperature
a. There are multiple blocking solutions however the best starting point is 1% BSA, 300mM glycine in PBS containing 0.1% Tween20 (PBS-T).
b. If blocking is insufficient or the antibody datasheet recommends then another good solution is 2% BSA, 3% serum (ideally from the same species as the secondary antibody) and 300mM glycine in PBS containing 0.1% Tween20.
2. Incubate cells in diluted primary antibody in 1% BSA in PBS-T in a humidified chamber for 1 hour at room temperature or overnight at 4°C.
a. Follow the antibody datasheet for an initial suggested dilution then optimise for each application
b. Tip: a plastic box containing a paper towel soaked in dH2O can be a good alternative where a more expensive humidifying chamber is not available.
3. Wash coverslips three times in PBS for 5 minutes per wash with agitation.
![]()
From now onwards all steps should be done in the dark to avoid bleaching of fluorophores conjugated to the secondary antibody.
4. Incubate cells with the secondary antibody in 1% BSA in PBS-T for 1 hour at room temperature.
a. Tip: Counterstains such as FITC Phalloidin (HB0814) or Rhodamine Phalloidin-TRITC (HB8621) can be added during the secondary incubation.
5. Wash three times with PBS for 5 minutes per wash.
6. Incubate cells with 1µg/ml DAPI for 1 minute to visualise cell nuclei
7. Wash with PBS once
8. Add a drop of mounting medium to each microscope slide then slowly lower the coverslip onto the slide taking care to avoid air bubbles.
a. If using a hard-set mounting medium then no sealing is necessary but if not then use clear nail varnish to seal the edges of the coverslip to stop the sample drying out.
9. Allow the mounting medium to dry then store the slides at 4ºC in the dark until ready to image.
5. Image preparation
While images are often captured in proprietary software designed by microscope manufacturers we recommend using the free Fiji edition of ImageJ for further analysis (available at www.imagej.net). While excellent support is available (see www.imagej.net/learn) particular features to highlight for immunocytochemistry analysis includes the ability to:
- Remove background signal from images. Go to Process -> Subtract background
- Count cells either by hand or automatically (see this helpful guide)
- Calculate the area of part of the image. Use the drawing tools to make a shape then go to Analyse -> Measure.
- Where a Z-stack has been captured ImageJ is able to both Z project (Image -> Stacks -> Z-project) and 3D project (Image -> Stacks -> 3D project) the stack to maximise the information gained from the Z-stack.
When exporting images make sure to always save at as higher quality as possible using a .tif format. Avoid using formats such as .gif, .png or .jpeg as these can compress the image therefore losing potentially important details.
6. ICC Solutions: Recipes and Preparation
10x PBS
Notes:
- Store at room temperature
- If using PBS tablets then add 1/10 of the dH2O specified by the manufacturer to make a 10x solution
| Reagent | Amount to Add | Final concentration | ||
| 500ml | 1000ml | 2000ml | ||
| NaCl | 40g | 80g | 160g | 1.37M |
| KCl | 1g | 2g | 4g | 27mM |
| Na2HPO4 | 7.2g | 14.4g | 28.8g | 100mM |
| KH2PO4 | 1.2g | 2.4g | 4.8g | 20mM |
| dH2O | ≈400ml | ≈800ml | ≈1600ml | - |
| Conc HCl | Adjust to pH 7.4 | - | ||
| dH2O | Make up to final volume required | - | ||
1x PBST
Notes:
- Tween20 is extremely viscous therefore it is often helpful to cut the end off the pipette tip using scissors to made pipetting easier.
- The solution will need a good mixing with a stirring bar before being ready to use
- Generally make up fresh and don’t keep for longer than a few days.
- Alternatively if using PBS tablets then follow manufacturer instructions to make 1xPBS then add Tween20 to a final concentration of 0.1% (1ml Tween20 / 1L of PBS)
| Reagent | Amount to Add | Final concentration | ||
| 500ml | 1000ml | 2000ml | ||
| 10x TBS / PBS | 50ml | 100ml | 200ml | 1x |
| dH2O | 450ml | 900ml | 1800ml | - |
| Tween20 | 0.5ml | 1ml | 2ml | 0.1% |
1x PBS – Triton X-100
Notes:
- Triton X-100 is extremely viscous therefore it is often helpful to cut the end off the pipette tip using scissors to made pipetting easier.
- The solution will need a good mixing with a stirring bar before being ready to use.
- Generally, make up fresh and don’t keep for longer than a few days.
| Reagent | Amount to Add | Final concentration | ||
| 500ml | 1000ml | 2000ml | ||
| 10x TBS / PBS | 50ml | 100ml | 200ml | 1x |
| dH2O | 450ml | 900ml | 1800ml | - |
| Triton X-100 | 0.5ml | 1ml | 2ml | 0.1% |
4% PFA in PBS
Notes:
- It is possible to buy either paraformaldehyde (PFA) in a powdered for or in a 40% solution. It is generally much easier to use the solution than powder.
- Over time 4% PFA can degrade therefore it is better to use a fresh solution than one that has been stored for a long period of time.
Using PFA Solution
Notes:
- PFA is extremely toxic and a powerful skin irritant, only ever use in a fume hood.
| Reagent | Amount to Add | Final concentration | ||
| 50ml | 100ml | 500ml | ||
| 40% PFA | 5ml | 10ml | 50ml | 4% |
| PBS 4 | 5ml | 90ml | 450ml | - |
| Check pH and adjust to pH 7.4 if necessary | ||||
Using PFA Powder
Notes:
- Powdered PFA is extremely dangerous, only ever weigh out and prepare in a fume hood.
- Powdered PFA is not very soluble in water therefore the solution will require heating with a stirring bar until fully dissolved. This may take up to 3 hours.
- Take extreme caution not to overheat the solution while dissolving to avoid boiling of the solution and do not leave.
| Reagent | Amount to Add | Final concentration | ||
| 50ml | 100ml | 500ml | ||
| PFA | 2g | 4g | 20g | 4% |
| PBS | 50ml | 100ml | 500ml | - |
| Check pH and adjust to pH 7.4 if necessary | ||||
Amount to Add Reagent 50ml 100ml 500ml Final concentratioINSERT
BSA + Glycine blocking solution
Notes:
- Make up fresh and ensure BSA is fully dissolved before use
| Reagent | Amount to Add | Final Concentration | ||||
| 10ml | 20ml | 50ml | 100ml | 500ml | ||
| BSA | 0.1g | 0.2g | 0.5g | 1g | 5g | 1% |
| Glycine | 0.23g | 0.45g | 1.12g | 2.25g | 11.26g | 300mM |
| PBS-T | 10ml | 20ml | 50ml | 100ml | 500ml | - |
Serum blocking solution
Notes:
- Make up fresh and ensure BSA is fully dissolved before use
- Use the same species serum as the secondary antibody for best results
| Reagent | Amount to Add | Final Concentration | ||||
| 10ml | 20ml | 50ml | 100ml | 500ml | ||
| BSA | 0.2g | 0.4g | 1g | 2g | 10g | 2% |
| Serum | 0.3ml | 0.6ml | 1.5ml | 3ml | 15ml | 3% |
| PBS-T | 9.7ml | 19.4ml | 48.5ml | 97ml | 485ml | - |
Antibody incubation solution (1% BSA PBS-T)
Notes:
- Make up fresh and ensure BSA is fully dissolved before use
| Reagent | Amount to Add | Final Concentration | ||||
| 10ml | 20ml | 50ml | 100ml | 500ml | ||
| BSA | 0.1g | 0.2g | 0.5g | 1g | 5g | 1% |
| PBS-T | 20ml | 50ml | 100ml | 500ml | - | |
| Antibody | As incubated on datasheet | |||||
DAPI staining solution
Notes:
- DAPI is normally stored as a 1mg/ml stock solution.
- Protect both the stock and working solution from light to avoid bleaching.
- DAPI is a potential mutagen therefore care should be taken to always handle with gloves while wearing correct PPE.
| Reagent | Amount to Add | |||||
| 10ml | 20ml | 50ml | 100ml | 500ml | Final Concentration | |
| 1mg/ml DAPI (available as HB8199) | 10µl | 20µl | 50µl | 100µl | 500µl | 1µg/ml |
| PBS | 10ml | 20ml | 50ml | 100ml | 500ml | - |
Antigen retrieval buffer
Notes:
- If stored for a period of time, re-check pH before use
| Reagent | Amount to Add | Final Concentration | ||||
| 10ml | 20ml | 50ml | 100ml | 500ml | ||
| Tris | 0.12g | 0.24g | 0.61g | 1.21 | 6.06g | 100mM |
| Urea | 0.5g | 1g | 2.5g | 5g | 25g | 5% |
| PBS | 10ml | 20ml | 50ml | 100ml | 500ml | - |
| Conc NaOH | Adjust pH to 9.5 | |||||
7. Troubleshooting ICC Problems
Immunocytochemistry is a long multi-step process with many different factors that need to be considered. At some point it is inevitable that something will go wrong or not be optimal. Below are compiled some of the most common pitfalls that can cause immunocytochemistry to not work.
| Problem | Potential cause | Suggested solutions |
| Weak or absent staining | Cells have detached from the coverslip |
- Be more gentle during washes or reduce the number of washes |
| Cells were poorly permeabilised |
- Try increasing the concentration of Triton X-100 |
|
| Cells dried out | - Ensure that cells are always covered in a excess of liquid throughout the protocol | |
| Cells are over fixed |
- Reduce the amount of time that cells are incubated with the fixative |
|
| Too little primary antibody |
- Increase the primary antibody concentration |
|
| Light exposure |
- Ensure that samples are never exposed to light once the secondary antibody has been applied |
|
| Wrong secondary antibody |
- Ensure the secondary antibody is specific for the species the primary was raised in |
|
|
Protein not present in target cells |
- Check literature to see if protein is expected to be present in cell population |
|
| Epitope obscured by fixation |
- Try a different fixative |
|
| Too short exposure |
- Increase exposure time and/or gain when imaging |
|
| High background | Non-specific binding |
Try testing the secondary antibody without a primary to ensure the secondary is not binding to targets within the cells |
| Poor blocking |
- Try changing the blocking solution |
|
| Too high antibody concentration |
- Try reducing primary antibody concentration |
|
| Reactive aldehyde groups |
- Consider introducing 1% NaBH4 in PBS incubation step |
|
| Spectral overlap |
- Ensure that the absorption/emission spectra of secondary antibodies do not overlap |
|
| Insufficient washing |
- Increase washing steps after secondary incubation |
|
| Non-specific staining | Antibody is binding to epitopes present in other proteins |
- Try a different antibody and see if the staining patterns correlate. |
| Antibody concentrations too high |
- Try reducing the primary and secondary antibody concentration |
|
| Reactivity with endogenous IgGs |
- Try using antibodies raised in species other than the source of the cells (especially in primary cell culture) |
8. Further Reading
Glynn, M., McAllister, A. 2006. Immunocytochemistry and quantification of protein colocalization in cultured neurons. Nat Protoc 1, 1287–1296. Doi: 10.1038/nprot.2006.220
Burry RW. 2011. Controls for immunocytochemistry: an update. J Histochem Cytochem. 59(1):6-12. Doi: 10.1369/jhc.2010.956920
Matos LL, Trufelli DC, de Matos MG, da Silva Pinhal MA. 2010. Immunohistochemistry as an important tool in biomarkers detection and clinical practice. Biomark Insights. 5:9-20. Doi: 10.4137/bmi.s2185