

In my cart
You have no items in your shopping cart.
Western Blot Protocol
This step by step protocol provides everything you need to carry out a successful Western Blot. Written by our PhD qualified expert antibody team, this western blot protocol includes advice for planning your western blot, carrying it out safely, analysing your results, as well as recipes for all the solutions you will need, and a troubleshooting guide.
Contents

1. Introduction
Western blotting, also known as immunoblotting, is a key technique in molecular biology to investigate changes in protein expression in a range of different tissue types. Proteins are first denatured before being loaded onto an acrylamide gel with an electric current applied. Proteins are separated by their mass before being transferred onto a membrane (either PDVF or nitrocellulose) and probed with antibodies to reveal expression of specific proteins.
2. Key Decisions
Before starting any western blot experiment it is important to consider the following points:
- What percentage acrylamide gel to use in order to get the best separation (see section 2.1)
- What blocking solution to use for the experimental conditions (see section 2.2)
- What loading controls should be included to account for variability in loading and transfer (see section 2.3)
2.1 Choosing an acrylamide gel percentage
2.1.1 Single concentration gels
In a SDS page all proteins are denatured and have a uniform negative charge applied to them therefore migration is due to differences in size. Polyacrylamide gels are a matrix of cross-linked acrylamide monomers with the tightness of the mesh dependent upon the amount of acrylamide and cross-linker present. Different sized proteins therefore require different formulations of acrylamide gel to get optimum separation (figure 1).
|
Protein size (kDa) |
Gel Percentage (%) |
|
4-40 |
20 |
|
12-45 |
15 |
|
10-70 |
12 |
|
15-100 |
10 |
|
25-200 |
7.5 |
|
>200 |
5 |
Table 1 Suggested concentrations of acrylamide gel depending upon protein of interest size. Where multiple proteins of differing sizes need to be separated consider using a gradient gel.
Where there is only one protein of interest or the proteins to be separated are of a similar size then a single concentration gel can be used. Generally the larger the protein the larger pore size is needed in the polyacrylamide gel and the smaller the protein the smaller the pore size (table 1). Once the gel concentration needed has been identified these can either be purchased as pre-cast gels or made in the laboratory using the recipe in table 2.
|
Reagent |
Order |
Gel concentration (%) |
|||||
|
20 |
15 |
12 |
10 |
7.5 |
5 |
||
|
dH2O |
1 |
0.93 ml |
2.34 ml |
3.28 ml |
3.98 ml |
4.78 ml |
5.61 ml |
|
1.5M Tris-HCl pH 8.8 |
2 |
2.5 ml |
2.5 ml |
2.5 ml |
2.5 ml |
2.5 ml |
2.5 ml |
|
10% SDS |
3 |
100 µl |
100 µl |
100 µl |
100 µl |
100 µl |
100 µl |
|
30% Acrylamide/Bis (29.2:0.8) |
4 |
6.7 ml |
5 ml |
4 ml |
3.3 ml |
2.5 ml |
1.67 ml |
|
10% APS |
5 |
50 µl |
50 µl |
50 µl |
50 µl |
50 µl |
50 µl |
|
TEMED |
6 |
10µl |
10µl |
10µl |
10µl |
10µl |
10µl |
Table 2 Recipe for the construction of polyacrylamide resolving gels. Makes a 10ml gel. Be sure to add reagents in the correct order with APS and TEMED being added last. CAUTION: Acrylamide is a potent neurotoxin therefore gloves should be worn at all times.
2.1.2 Variable concentration gels
If multiple proteins of significantly differing sizes need to be separated then gradient gels can be instead used. These vary the concentration of the gel along the migration path to provide optimal separation. These can be made in the laboratory but are more easily purchased.
2.1.3 Stacking gels
In order to line up proteins before they enter the resolving gel it is important for proteins to pass through a short layer of stacking gel (Figure 1). This allows proteins to enter the resolving gel at the same point and is the same acrylamide concentration regardless of protein size (Table 3).

Figure 1. Structure of an acrylamide gel for SDS-PAGE
|
Reagent |
Order |
Volume |
|
dH2O |
1 |
3.05 ml |
|
0.5M Tris-HCl pH 6.8 |
2 |
1.25 ml |
|
10% SDS |
3 |
50µl |
|
30% Acrylamide/Bis (29.2:0.8) |
4 |
650µl |
|
10% APS |
5 |
25µl |
|
TEMED |
6 |
10µl |
Table 3 Recipe for acrylamide stacking gel. Makes 5ml suitable for a 10ml resolving gel. Be sure to add reagents in the correct order with APS and TEMED being added last. CAUTION: Acrylamide is a potent neurotoxin therefore gloves should be worn at all times when making or handling the gel.
2.2 Choosing a buffer
Western blots are carried out using either phosphate buffered saline (PBS) or Trizma buffered saline (TBS). While these can often be used interchangeably it is important to consider key differences between the different buffers and make a choice of buffer accordingly (Table 4).
|
Factor |
PBS |
TBS |
|
Temperature pH stability |
Relatively stable |
pH can be highly temperature dependent |
|
Suitability for use with phosphorylation specific antibodies |
Not suitable |
Suitable |
|
Suitable for use with alkaline phosphatase labelled antibodies |
Not suitable |
Suitable |
|
Cost |
Lower |
Higher |
|
Suitable for use with living cells |
Suitable |
Not suitable |
Table 4 Comparison between PBS and TBS buffers.
2.3 Choosing a blocking solution
It is important to choose the correct blocking solution dependent on what experiment is being carried out and what antibodies are being used. For example BSA and milk contain phosphotyrosine which will interrupt experiments using phosphorylation specific antibodies. Additionally alkaline phosphatase can be inhibited by certain milk preparations. For a summary of the different blocking solutions see table 5.
|
Blocking solution |
Constituents |
Advantages |
Disadvantages |
|
Milk based |
5% non-fat dry milk in PBS-T / TBS-T |
|
|
|
BSA |
3% BSA in PBS-T / TBS-T |
|
|
|
Fish skin gelatin |
1% fish skin gelatin in PBS-T / TBS-T |
|
|
|
Serum |
10% serum in PBS-T / TBS-T |
|
|
Table 5. Comparison between commonly used blocking buffers in western blotting.
2.2.1 Milk based blocking solutions
The most commonly used blocking solution is a solution of 5% non-fat dry milk in PBS-T which works well for the vast majority of applications at a inexpensive price. Some preparations contain sodium azide as a preservative although it should be noted that azide can inhibit horseradish peroxidase, the most commonly used secondary antibody conjugate in western blots. Due to the rapid growth of microbial contamination milk based solutions should be made up fresh for every application. Milk based blocking solutions should not be used for any experiments involving phosphorylation specific antibodies due to the presence of casein which is a phosphoprotein that can interfere with detection. Alkaline phosphatase antibodies can also be inhibited by some preparations of milk alongside biotin labelled antibodies being interfered with by the milk preparation.
2.3.2 BSA
BSA is also widely used as it is suitable for all detection systems as it does not contain biotin or phosphopeptides. There can however be issues with contamination from native immunoglobulins which can cause issues with cross-reactivity. BSA is normally prepared as a 3% dilution in PBS-T or TBS-T. The main drawback of BSA usage is it’s relatively high cost compared to other blocking solutions.
2.3.3 Fish skin gelatin
Fish skin gelatin based blocking solutions offer an excellent alternative to other blocking solutions due to its lack of mammalian proteins which reduces the risk of antibody cross-reactivity with the blocking buffer. Fish skin gelatin is also cheap however it should be noted that it isn’t appropriate for use with biotin labelled antibodies due to it containing biotin. Fish skin gelatin is normally used as a 1% solution in PBS-T or TBS-T and has the advantage of remaining liquid at room temperature compared to porcine gelatin.
2.3.4 Serum
Serum is another option when considering which blocking solution to use however is declining in popularity due to its high cost and the risk of cross-reactivity with immunoglobulins present in the serum. It has however been reported to offer a clean background and is commonly used as a 10% dilution in either PBS-T or TBS-T.
2.4 Selection of appropriate loading controls
2.4.1 What are loading controls?
- Loading controls are antibodies against a different target to the protein of interest used in immunoblotting (Western blotting). These targets are often highly expressed housekeeping proteins who’s expression is stable. Loading controls are essential when the relative expression of proteins is being compared in a gel and are used to:
- Ensure that the loading of proteins is uniform across the whole gel. Where there has been unequal loading the loading control can be used to account for this.
- Ensure that there has been equal transfer of proteins from gel to membrane across the gel
2.4.2 Choosing a loading control
There are several key principles that need to be followed when choosing a loading control for immunoblotting:
- The loading control and target of interest should have different molecular weights to ensure they do not overlap on the gel
- The loading control expression should not be effected by any experimental manipulation between samples.
- The loading control should have high levels of expression in the sample
- The loading control should be in the portion of the gel where there is linear separation otherwise it will not be possible to quantify it.
Use table 6 to help identify a suitable loading control depending on molecular weight of the target protein and the subcellular location of the sample. You can view all the loading controls available from Hello Bio here.
|
Molecular weight (kDa) |
Whole cell |
Mitochondrial |
Nuclear |
Membrane |
Cytoskeleton |
Serum |
|
125 |
Vinculin |
|
|
|
|
|
|
110 |
|
|
|
NaK ATPase |
|
|
|
75 |
|
|
|
|
|
Transferrin |
|
66 |
|
|
Lamin B1 |
|
|
|
|
60 |
|
HDAC1 |
|
|
|
|
|
55 |
|
|
|
|
|
|
|
50 |
Alpha tubulin |
|
|
|
Alpha tubulin |
|
|
Beta tubulin |
|
|
|
Beta tubulin |
|
|
|
45 |
Actin |
|
YY1 |
|
Actin |
|
|
40 |
Beta actin |
|
|
|
Beta actin |
|
|
35 |
|
TBP |
|
|
|
|
|
30 |
|
VDAC1/Porin |
PCNA |
|
|
|
|
20 |
|
Cyclophilin B |
|
|
|
|
|
|
Cofilin |
COX IV |
|
Cofilin |
|
|
|
15 |
|
|
Histone H3 |
|
|
|
Table 6. Common loading controls. Molecular weight is of the loading control therefore choose one at a different mass to the target of interest.
3. Equipment and consumables
Assuming a base level of standard laboratory equipment (e.g. pipettes, de-ionised water system, measuring cylinders etc) the specific equipment and consumables you will require for western blotting are detailed by stage within this section.
3.1 SDS Page
|
Equipment |
Consumables |
|
Powerpack |
Protein ladder |
|
Gel tank and cassette |
Filter papers |
|
Casting plates |
Running buffer |
|
Combs (same thickness as casting plates) |
Sample buffer |
|
Casting stand and gel holders |
Ethanol |
|
Heating block (able to achieve 85ºC) |
Resolving gel |
|
Microcentrifuge |
Stacking gel |
|
Loading tips (not essential but make gel loading easier) |
|
3.1 Electrophoretic transfer
|
Equipment |
Consumables |
|
Powerpack |
Transfer buffer |
|
Gel tank and cassettes |
Filter papers |
|
Large shallow tray (for preparing transfer cassettes in) |
PVDF membrane |
|
Roller (for removing bubbles in transfer sandwich with) |
Methanol |
|
Absorbent pads |
|
|
Ice pack |
|
|
Magnetic stirring plate and stirring bars |
|
|
Gel opening tool |
|
3.3 Immunoblotting
|
Equipment |
Consumables |
|
Rocker |
PBS-T |
|
Containers for putting membranes in |
Blocking solution |
|
Heat sealer |
Primary antibody |
|
Detection system (e.g. film with darkroom or gel imaging system) |
Secondary antibody |
|
|
Plastic bags for heat sealer |
|
|
Enhanced chemiluminescence substrate (ECL substrate) |
|
|
Optional: Ponceau stain |
4. Protocol
4.1 Safety
Many of the chemicals used in western blotting have dangerous properties and can cause serious harm if not handled correctly. Always follow local rules and read the full COSHH document for any chemical that you have not used previously. Always wear appropriate PPE such as a lab coat and gloves.
Specifically highlighted hazards:
- Acrylamide is an extremely toxic neurotoxin and carcinogen in monomeric forms. Wipe down benches after use and dispose of gels and any contaminated waste into separated acrylamide waste.
- Beta-mercaptoethanol is toxic and needs disposing separately to normal laboratory waste.
4.2 SDS Page
1. Clean casting stand and gel holders with distilled water. Clean plates with distilled water.
2. Construct gel mould on holder
- Place the casting frame upright with the pressure cams in the open position and facing forward on a flat surface.
- Select a spacer plate of the desired gel thickness and place a short plate on top of it.
- Orient the spacer plate so that the labelling is up. Slide the two glass plates into the casting frame, keeping the short plate facing the front of the frame (side with pressure cams)
- When the glass plates are in place, engage the pressure cams to secure the glass cassette sandwich in the casting frame. Check that both plates are flush at the bottom.
- Place the casting frame into the casting stand by positioning the casting frame (with the locked pressure cams facing out) onto the casting gasket while engaging the spring-loaded lever of the casting stand onto the spacer plate.
- It is often a good idea to fill the gel plates with dH2O to check for leaks while making the resolving gel. Pour out when ready to pour the resolving gel.
3. Mix resolving gel (adding ammonium persulphate and TEMED last) and pour immediately. The resolving gel should be far enough below the top of the gel plates to allow insertion of the comb + 1cm.
|
Reagent |
Order |
|
Gel concentration (%) |
||||
|
20 |
15 |
12 |
10 |
7.5 |
5 |
||
|
dH2O |
1 |
0.93ml |
2.60ml |
3.59ml |
4.26ml |
5.09ml |
5.93ml |
|
1.5M Tris-HCl pH 8.8 |
2 |
2.5ml |
2.5ml |
2.5ml |
2.5ml |
2.5ml |
2.5ml |
|
10% SDS |
3 |
100µl |
100 µl |
100 µl |
100 µl |
100 µl |
100 µl |
|
30% Acrylamide/Bis (29.2:0.8) |
4 |
6.66ml |
5.00ml |
4.00ml |
3.33ml |
2.50ml |
1.67ml |
|
10% APS |
5 |
50µl |
50µl |
50µl |
50µl |
50µl |
50µl |
|
TEMED |
6 |
10µl |
10µl |
10µl |
10µl |
10µl |
10µl |
Optional: Degas the mixture using a tap vacuum setup for 10 minutes (make sure to remove bung before turning off tap)
4. Overlay resolving gel gently with water or ethanol to maintain a flat surface on the resolving gel during polymerisation. Leave to set for 15/20 minutes.
Tip: Make excess gel and then monitor the polymerisation using this.
5. Mix stacking gel except APS and TEMED. Pour off overlay and use a tissue wick to remove the last remnants. Add APS and TEMED to stacking gel and pour. Add the comb with no air bubbles and leave to set for around 20 minutes.
|
Reagent |
Order |
Volume |
||||
|
1 gel |
2 gels |
3 gels |
4 gels |
5 gels |
||
|
dH2O |
1 |
3.05ml |
6.10ml |
9.15ml |
12.2ml |
15.25ml |
|
0.5M Tris-HCl pH 6.8 |
2 |
1.25ml |
2.5ml |
3.75ml |
5ml |
6.25ml |
|
10% SDS |
3 |
50µl |
100 µl |
150 µl |
200 µl |
250 µl |
|
30% Acrylamide/Bis (29.2:0.8) |
4 |
650µl |
1.3ml |
1.95ml |
2.6ml |
3.25ml |
|
10% APS |
5 |
25µl |
50µl |
75µl |
100µl |
125µl |
|
TEMED |
6 |
10µl |
20µl |
30µl |
40µl |
50µl |
Optional: Degas the mixture using a tap vacuum setup for 10 minutes (make sure to remove bung before turning off tap)
6. Heat samples in sample buffer for 10 minutes at 85⁰C. Give samples a quick spin before loading to remove debris.
7. Make up 1l of 1X running buffer (diluting 10X buffer as necessary). Construct running assembly making sure seals are tight (use grease if necessary). Add running buffer to top tank (above level of gel, CATHODE). Check for leaks. Add running buffer to bottom tank (ANODE)
8. Remove comb. Gently wash out each well
9. Add samples in sample buffer. Ideally do not use outside wells. Run markers in central well and at side. Any unused wells should be filled with a small volume of 1X sample buffer. Sample loading volumes should be from 5 μL–35 μL per lane (depending on gel).
- Make sure a consistent quantity of protein is loaded per well ≈ 20µg.
- Use around 4-5µl of marker, one option is to load 2µl of marker on one side of the gel and 5µl on the other to distinguish sides.
- Mix marker with sample buffer to make up to the same loading volume as samples
10. Connect up equipment (red to red, black to black)
11. Run at 60V until dye front is in the resolving gel (30 minutes) and then run at 120-150V in gel (45-90 minutes). Vary by experience and do not exceed 200V.
12. Stop when gel front nears bottom.
4.3 Electrophoretic transfer
1. Cut out a rectangle of PDVF membrane using a template to fit the size of the gel. Write the date and name of experiment on the membrane in pen
2. Wash membrane with methanol for 30 seconds (methanol can be reused)
3. Wash membrane with transfer buffer
4. Soak the blotting paper and sponges in transfer buffer
5. Put cassette (red and black) into tank
6. Take gel out of running tank and carefully open the plates; cut off the stacking gel and put in acrylamide waste
7. Soak the gel in transfer buffer
8. Assemble the cassette in the following order making sure to keep everything as wet as possible:
- Black side of cassette
- Sponge
- 3x blotting paper
- Gel face down (so the ladder is on the right side of the gel with the red marker nearer the top)
- Membrane also face down
- 3x blotting paper (after this step you can use a roller to gently get rid of any bubbles between the gel and the membrane)
- Sponge
- Clear side of cassette
9. Close the cassette and put into the holder making sure the colours align. The proteins will run towards the positive anode (red)
10. Add the ice block and stirring bar
11. Fill up the tank with transfer buffer without it overflowing
12. Turn on stirring plate and put on lid
13. Set the power pack to 400 mA for 90 minutes (check there are bubbles before leaving). Pause point: The membranes can be left in transfer buffer overnight for processing the next day however this means that the entire protocol will take 3 days as opposed to 2 if the primary antibody addition is achieved on day 1.
4.4 Immunoblotting
1. Rinse the membrane several times with PBS-T.
2. Add a blocking solution. The choice of blocking will depend upon the target and upon the detection method. E.g. alkaline phosphatase is inhibited by some milk preparations.
3. Incubate with agitation for 2hrs
4. Add the primary antibody solution. All antibodies should be diluted in blocking solution. Incubate overnight with agitation in the cold room.
- Add the antibody to strip to a plastic bag then use a heat sealer to seal the pouch. Doing this should mean only around 1ml per bag is needed.
5. Wash the blot with 3 quick changes of PBS-T then 3 times for 5 minutes under agitation.
6. Add the secondary antibody to blocking solution. Incubate for 1-2hrs at room temperature with agitation. For fluorescently labelled secondary antibodies all steps should be done in the dark from now on.
7. Wash the blot with 3 quick changes of PBS-T then 3 times for 5 minutes under agitation.
8. Detect using ECL (for HRP conjugated secondaries). Follow manufacturer instructions and cover membrane with transparent plastic sheet to stop it drying out.
- Detection can be either through the use of film and a darkroom or by using a gel imaging system.
- Film: Generally the most sensitive but can be expensive and it is more difficult to use for quantitative measurements
- Imaging system: Once initial outlay has been paid is much cheaper and allows accurate quantitative measures. However can be less sensitive than film.
4.5 Stripping and Re-probing
Following the completion of an immunoblot it is possible to remove the primary and secondary antibodies then re-probe the membrane for a new target. This is commonly used with a loading control antibody following probing for a protein of interest. The same membrane can be stripped and re-probed multiple times, however each treatment removes protein from the membrane which should be taken into account. This protocol requires a PVDF membrane and detection using ECL.
1. Incubate membrane in two changes of stripping buffer at room temperature for 10 minutes an incubation.
2. Wash membrane in 3 quick changes of PBST
3. Proceed to blocking (step 2 of section 4.4)
If you want to check that stripping has been successful then incubate membrane with ECL detection substrates after step 2 then image. The bands from the previous antibody should have disappeared and there be a clear uniform background.
5. Analysis
5.1 Measuring the molecular weight of a protein
The molecular weight of a protein can be estimated by comparing the migration of proteins of known molecular weight (such as in a protein ladder) and the target protein. A general procedure for doing this is:
- Run the gel using a molecular weight ladder, transfer to the membrane and then visualise the proteins using a dye such as Coomassie blue or Ponceau.
- Calculate the relative migration distance (Rf) of each protein standard and the target protein using the equation below. This can either be measured using a ruler or within appropriate software.


- Plot the log(MW) of the protein standards against relative migration distance (Rf) on a graph and generate a curve of best fit. This should be linear if the samples are fully denatured and the gel percentage was adequate for sufficient separation.
- Use the equation of the best fit line to calculate the mass of the target using its Rf. The general equation is: which in figure 2 simplifies to:
- The actual protein molecular weight as determined by mass spectrometry is likely to differ from the estimated through western blotting due to differences in glycosylation status, experimental inaccuracies and some proteins not being amenable to full denaturation by SDS.
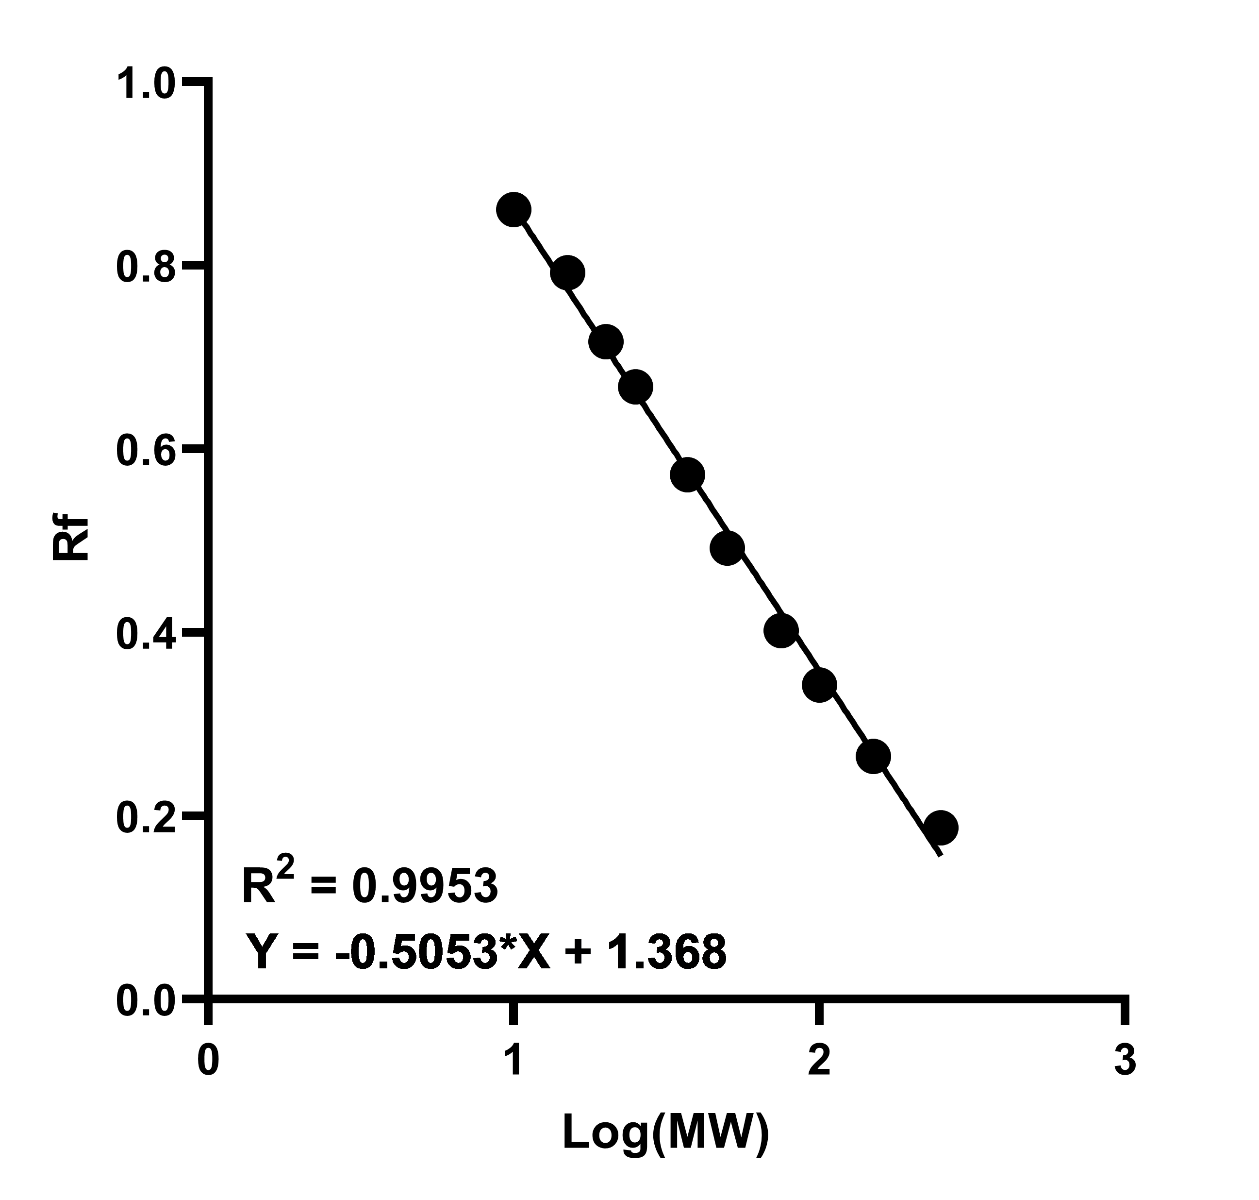
Figure 2. Example standard curve of log(MW) against relative migration (Rf). A high R2 value indicates increased accuracy in interpretation of the unknown proteins MW.
5.2 Quantifying protein expression from an immunoblot
Protein expression can be quantitatively compared within a immunoblot using densitometry. Crucially this technique can only inform of relative changes in abundance between samples therefore without known standards, cannot be used to give exact concentrations.
- Before trying to take any quantitative measurements it is critical to make sure that the signal is not saturated and is in its linear range (figure 3). If the signal is saturated then it isn’t possible to accurately compare different protein abundances. However, saturation is a relatively easy problem to solve as by reducing the exposure time this can be avoided. However, where there are large differences in protein abundance between samples then it may be necessary to re-attempt the western blot with more similar protein concentrations if it isn’t possible to have both bands properly exposed (i.e. one is always saturated to see the other). Reducing the concentration of primary antibody is also another way of reducing saturation.
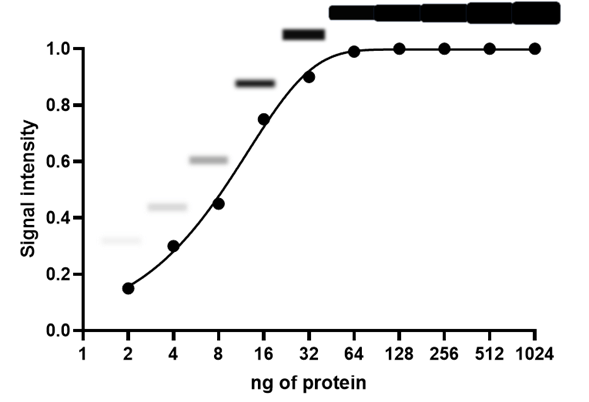
Figure 3: Example curve showing the saturation of western blot signal at high levels of bound protein. Above each datapoint is a representative illustration of the band seen. Adapted from Bell, 2016. BMC Biol; 14:116.
- It is next important to subtract any background noise from the image. Differences in background across the blot may not be consistent leading to changes in band darkness that are influenced by background, not signal intensity. This step is easily achieved in both bespoke analysis software and freeware such as ImageJ (https://imagej.nih.gov/).
- Next it is critical to normalise the signal intensity for protein loading. Naturally each lane will have a slightly different amount of protein in it therefore by normalising to expression of stably expressed “housekeeping” proteins such as GAPDH or β-actin this can help to ensure that any changes in expression of a target protein are not just due to differences in loading. It is important when designing the experiment to think about whether the manipulation might affect expression of the loading control and another issue is that due to high expression it is often difficult to capture them in their linear range.
- Finally it is important to subject results to the appropriate statistical tests for the experimental design. It should be planned before the experiment was carried out what n-number was needed to achieve a sufficient statistical power (often chosen as 0.8).
6. Solutions & Recipes
6.1 Buffers
0.5M Tris-HCl pH 6.8
Note: For longer term storage autoclave then store at 4ºC
|
Reagent |
Amount to add |
||
|
100ml |
500ml |
1000ml |
|
|
Tris-base |
6.06g |
30.29g |
60.57g |
|
dH2O |
≈80ml |
≈400ml |
≈800ml |
|
Conc. HCl |
Adjust pH to 6.8 |
||
|
dH2O |
Make up to final volume required |
||
1.5M Tris-HCl pH 8.8
Note: For longer term storage autoclave then store at 4ºC
|
Reagent |
Amount to add |
||
|
100ml |
500ml |
1000ml |
|
|
Tris-base |
18.17g |
90.86g |
181.71g |
|
dH2O |
≈80ml |
≈400ml |
≈800ml |
|
Conc. HCl |
Adjust pH to 8.8 |
||
|
dH2O |
Make up to final volume required |
||
10x running buffer
Notes:- For 1x buffer dilute with dH2O in a 1:10 dilution
- SDS powder is a potent respiratory irritant therefore should be weighed out in the fume hood or with breathing protection.
- Store at room temperature
|
Reagent |
Amount to add |
Final concentration |
||
|
500ml |
1000ml |
2000ml |
||
|
Glycine |
72g |
144g |
288g |
1.91M |
|
Tris-base |
15g |
30g |
60g |
247mM |
|
SDS |
5g |
10g |
20g |
35mM |
|
dH2O |
Make up to final volume required |
|||
10x transfer buffer
Notes:- Store at room temperature
- For 1x buffer dilute 1:10 with dH2O / 20% methanol
|
Reagent |
Amount to add |
Final concentration |
||
|
500ml |
1000ml |
2000ml |
||
|
Glycine |
72g |
144g |
288g |
1.91M |
|
Tris-base |
15g |
30g |
60g |
247mM |
|
dH2O |
Make up to final volume required |
|||
10% SDS
Notes:- Store at room temperature
- Over time SDS may precipitate out of solution. If this occurs remix until all SDS has re-dissolved.
|
Reagent |
Amount to add |
||
|
100ml |
200ml |
500ml |
|
|
SDS |
10g |
20g |
50g |
|
dH2O |
Make up to final volume required |
||
2x Sample loading buffer
Note: store in aliquots at -20ºC
|
Reagent |
Amount to add |
Final concentration |
||
|
5ml |
50ml |
100ml |
||
|
10% SDS |
2ml |
20ml |
40ml |
4% |
|
0.2% Bromophenol blue |
0.1ml |
1ml |
2ml |
0.004% |
|
Glycerol |
1ml |
10ml |
20ml |
20% |
|
0.5M Tris-HCl pH 6.8 |
1.25ml |
12.5ml |
25ml |
0.125M |
|
ß-mercaptoethanol |
0.5ml |
5ml |
10ml |
10% |
|
H2O |
0.15ml |
1.5ml |
3ml |
- |
10% APS
Note: store in aliquots at -20ºC
|
Reagent |
Amount to add |
||
|
10ml |
50ml |
100ml |
|
|
Ammonium persulphate |
1g |
5g |
10g |
|
dH2O |
Make up to final volume required |
||
10x PBS
Note: store at room temperature
|
Reagent |
Amount to add |
Final concentration |
||
|
500ml |
1000ml |
2000ml |
||
|
NaCl |
40g |
80g |
160g |
1.37M |
|
KCl |
1g |
2g |
4g |
27mM |
|
Na2HPO4 |
7.2g |
14.4g |
28.8g |
100mM |
|
KH2PO4 |
1.2g |
2.4g |
4.8g |
20mM |
|
dH2O |
≈400ml |
≈800ml |
≈1600ml |
- |
|
Conc HCl |
Adjust to pH 7.4 |
- |
||
|
dH2O |
Make up to final volume required |
- |
||
10x TBS
Note: store at room temperature
|
Reagent |
Amount to add |
Final concentration |
||
|
500ml |
1000ml |
2000ml |
||
|
NaCl |
40g |
80g |
160g |
1.37M |
|
Tris-base |
12.1g |
24.2g |
48.5g |
200mM |
|
dH2O |
≈400ml |
≈800ml |
≈1600ml |
- |
|
Conc HCl |
Adjust to pH 7.4 |
- |
||
|
dH2O |
Make up to final volume required |
- |
||
1x PBST / TBST
Notes:
- Tween20 is extremely viscous therefore it is often helpful to cut the end off the pipette tip using scissors to made pipetting easier.
- The solution will need a good mixing with a stirring bar before being ready to use
- Generally make up fresh and don’t keep for longer than a few days.
|
Reagent |
Amount to add |
Final concentration |
||
|
500ml |
1000ml |
2000ml |
||
|
10x TBS / PBS |
50ml |
100ml |
200ml |
1x |
|
dH2O |
450ml |
900ml |
1800ml |
- |
|
Tween20 |
0.5ml |
1ml |
2ml |
0.1% |
Stripping buffer
Notes:
- The buffer can sometimes go cloudy over time however this does not appear to impact it’s effectiveness.
- Store at room temperature
- Tween20 is extremely viscous therefore it is often helpful to cut the end off the pipette tip using scissors to made pipetting easier.
| Reagent | Amount to add | Final concentration | ||
| 100ml | 500ml | 1000ml | ||
| Glycine | 1.5g | 7.5g | 15g | 200mM |
| SDS | 0.1g | 0.5g | 1g | 0.1% |
| Tween20 | 1ml | 5ml | 10ml | 1% |
| dH2O | ≈80ml | ≈400ml | ≈800ml | - |
| Conc HCl | Adjust to pH 2.2 | - | ||
| dH2O | Make up to final volume required | - | ||
Gel formulations
Note: Make sure to add reagents in the order indicated. Acrylamide is a potent neurotoxin therefore take appropriate precautious and wear suitable PPE.
5% resolving gel
For proteins larger than 200kDa.| Reagent | Order | Gels | Unit | |||||||
| 1 | 2 | 3 | 4 | 5 | 6 | 7 | 8 | |||
| dH2O | 1 | 5.93 | 11.85 | 17.78 | 23.70 | 29.63 | 35.55 | 41.48 | 47.40 | ml |
| 1.5M Tris-HCl pH 8.8 |
2 | 2.5 | 5.0 | 7.5 | 10.0 | 12.5 | 15.0 | 17.5 | 20.0 | ml |
| 10% SDS | 3 | 100 | 200 | 300 | 400 | 500 | 600 | 700 | 800 | µl |
| 30% Acrylamide/Bis (29.2:0.8) | 4 | 1.67 | 3.33 | 5.00 | 6.66 | 8.33 | 9.99 | 11.66 | 13.32 | ml |
| 10% APS | 5 | 50 | 100 | 150 | 200 | 250 | 300 | 350 | 400 | µl |
| TEMED | 6 | 10 | 20 | 30 | 40 | 50 | 60 | 70 | 80 | µl |
7.5% resolving gel
For proteins sized between 25 and 200 kDa.| Reagent | Order | Gels | Unit | |||||||
| 1 | 2 | 3 | 4 | 5 | 6 | 7 | 8 | |||
| dH2O | 1 | 5.09 | 10.19 | 15.28 | 20.37 | 25.46 | 30.56 | 35.65 | 40.74 | ml |
| 1.5M Tris-HCl pH 8.8 |
2 | 2.5 | 5.0 | 7.5 | 10.0 | 12.5 | 15.0 | 17.5 | 20.0 | ml |
| 10% SDS | 3 | 100 | 200 | 300 | 400 | 500 | 600 | 700 | 800 | µl |
| 30% Acrylamide/Bis (29.2:0.8) | 4 | 2.50 | 5.00 | 7.49 | 9.99 | 12.49 | 14.99 | 17.48 | 19.98 | ml |
| 10% APS | 5 | 50 | 100 | 150 | 200 | 250 | 300 | 350 | 400 | µl |
| TEMED | 6 | 10 | 20 | 30 | 40 | 50 | 60 | 70 | 80 | µl |
10% resolving gel
For proteins sized between 15 and 100kDa.| Reagent | Order | Gels | Unit | |||||||
| 1 | 2 | 3 | 4 | 5 | 6 | 7 | 8 | |||
| dH2O | 1 | 4.26 | 8.52 | 12.78 | 17.04 | 21.30 | 25.56 | 29.82 | 34.08 | ml |
| 1.5M Tris-HCl pH 8.8 |
2 | 2.5 | 5.0 | 7.5 | 10.0 | 12.5 | 15.0 | 17.5 | 20.0 | ml |
| 10% SDS | 3 | 100 | 200 | 300 | 400 | 500 | 600 | 700 | 800 | µl |
| 30% Acrylamide/Bis (29.2:0.8) | 4 | 3.33 | 6.66 | 9.99 | 13.32 | 16.65 | 19.98 | 23.31 | 26.64 | ml |
| 10% APS | 5 | 50 | 100 | 150 | 200 | 250 | 300 | 350 | 400 | µl |
| TEMED | 6 | 10 | 20 | 30 | 40 | 50 | 60 | 70 | 80 | µl |
12% resolving gel
For proteins sized between 10 and 70kDa.| Reagent | Order | Gels | Unit | ||||||||
| 1 | 2 | 3 | 4 | 5 | 6 | 7 | 8 | ||||
| dH2O | 1 | 3.59 | 7.19 | 10.78 | 14.38 | 17.97 | 21.56 | 25.16 | 28.75 | ml | |
| 1.5M Tris-HCl pH 8.8 |
2 | 2.5 | 5.0 | 7.5 | 10.0 | 12.5 | 15.0 | 17.5 | 20.0 | ml | |
| 10% SDS | 3 | 100 | 200 | 300 | 400 | 500 | 600 | 700 | 800 | µl | |
| 30% Acrylamide/Bis (29.2:0.8) | 4 | 4.00 | 7.99 | 11.99 | 15.98 | 19.98 | 23.98 | 27.97 | 31.97 | ml | |
| 10% APS | 5 | 50 | 100 | 150 | 200 | 250 | 300 | 350 | 400 | µl | |
| TEMED | 6 | 10 | 20 | 30 | 40 | 50 | 60 | 70 | 80 | µl | |
15% resolving gel
For proteins sized between 12 and 45kDa.| Reagent | Order | Gels | Unit | |||||||
| 1 | 2 | 3 | 4 | 5 | 6 | 7 | 8 | |||
| dH2O | 1 | 2.60 | 5.19 | 7.79 | 10.38 | 12.98 | 15.57 | 18.17 | 20.76 | ml |
| 1.5M Tris-HCl pH 8.8 |
2 | 2.5 | 5.0 | 7.5 | 10.0 | 12.5 | 15.0 | 17.5 | 20.0 | ml |
| 10% SDS | 3 | 100 | 200 | 300 | 400 | 500 | 600 | 700 | 800 | µl |
| 30% Acrylamide/Bis (29.2:0.8) | 4 | 5.00 | 9.99 | 14.99 | 19.98 | 24.98 | 29.97 | 34.97 | 39.96 | ml |
| 10% APS | 5 | 50 | 100 | 150 | 200 | 250 | 300 | 350 | 400 | µl |
| TEMED | 6 | 10 | 20 | 30 | 40 | 50 | 60 | 70 | 80 | µl |
20% resolving gel
For proteins between 4 and 40kDa.| Reagent | Order | Gels | Unit | |||||||
| 1 | 2 | 3 | 4 | 5 | 6 | 7 | 8 | |||
| dH2O | 1 | 0.93 | 1.86 | 2.79 | 3.72 | 4.65 | 5.58 | 6.51 | 7.44 | ml |
| 1.5M Tris-HCl pH 8.8 |
2 | 2.5 | 5.0 | 7.5 | 10.0 | 12.5 | 15.0 | 17.5 | 20.0 | ml |
| 10% SDS | 3 | 100 | 200 | 300 | 400 | 500 | 600 | 700 | 800 | µl |
| 30% Acrylamide/Bis (29.2:0.8) | 4 | 6.66 | 13.32 | 19.98 | 26.64 | 33.30 | 39.96 | 46.62 | 53.28 | ml |
| 10% APS | 5 | 50 | 100 | 150 | 200 | 250 | 300 | 350 | 400 | µl |
| TEMED | 6 | 10 | 20 | 30 | 40 | 50 | 60 | 70 | 80 | µl |
Stacking gel
Note: Make sure to add in the order indicated. Acrylamide is a potent neurotoxin therefore take appropriate precautious and wear suitable PPE.
|
Reagent |
Order |
Gels |
Unit |
|||||||
|
1 |
2 |
3 |
4 |
5 |
6 |
7 |
8 |
|||
|
dH2O |
1 |
3.05 |
6.10 |
9.15 |
12.2 |
15.25 |
18.3 |
21.35 |
24.4 |
ml |
|
0.5M Tris-HCl pH 6.8 |
2 |
1.25 |
2.5 |
3.75 |
5 |
6.25 |
7.5 |
8.75 |
10 |
ml |
|
10% SDS |
3 |
50 |
100 |
150 |
200 |
250 |
300 |
350 |
400 |
µl |
|
30% Acrylamide/Bis (29.2:0.8) |
4 |
0.65 |
1.3 |
1.95 |
2.6 |
3.25 |
3.9 |
4.55 |
5.2 |
ml |
|
10% APS |
5 |
25 |
50 |
75 |
100 |
125 |
150 |
175 |
200 |
µl |
|
TEMED |
6 |
10 |
20 |
30 |
40 |
50 |
60 |
70 |
80 |
µl |
6.3 Blocking solutions
See section 2.2 for advice on choosing a blocking solution.
Blotto
Note:- Make up fresh for every application
- For longer term incubations it is possible to add sodium azide to a final concentration of 0.01% to prevent bacterial growth.
|
Reagent |
Amount to add |
Final concentration |
||
|
10ml |
20ml |
50ml |
||
|
1x PBST/TBST |
10ml |
20ml |
50ml |
- |
|
Non-fat dry milk (NFDM) |
0.5g |
1g |
2.5g |
5% |
BSA
Note:
- Make up fresh for every application
- For longer term incubations it is possible to add sodium azide to a final concentration of 0.01% to prevent bacterial growth.
|
Reagent |
Amount to add |
Final concentration |
||
|
10ml |
20ml |
50ml |
||
|
1x PBST/TBST |
10ml |
20ml |
50ml |
- |
|
Bovine serum albumin (BSA) |
0.3g |
0.6g |
1.5g |
3% |
Fish skin gelatin
Note:
- Make up fresh for every application
- For longer term incubations it is possible to add sodium azide to a final concentration of 0.01% to prevent bacterial growth.
| Reagent | Amount to add | Final concentration | ||
| 10ml | 20ml | 50ml | ||
| 1x PBST/TBST | 10ml | 20ml | 50ml | - |
| Fish skin gelatin | 1g | 2g | 5g | 1% |
Serum
Note:
- Make up fresh for every application
- For longer term incubations it is possible to add sodium azide to a final concentration of 0.01% to prevent bacterial growth.
| Reagent | Amount to add | Final concentration | ||
| 10ml | 20ml | 50ml | ||
| 1x PBST | 9ml | 18ml | 45ml | - |
| Serum from same species as secondary antibody | 1ml | 2ml | 5ml | 10% |
7. Troubleshooting
Western blotting is a long multi-step process with many different factors that need to be considered. At some point it is inevitable that something will go wrong or not be optimal. Below are compiled some of the most common pitfalls that can cause western blots to not work.
|
Problem |
Potential cause |
Suggested solutions |
|
No bands or faint signal |
Incomplete transfer of proteins from the acrylamide gel to PVDF membrane |
|
|
Over-transfer of proteins through PVDF membrane if transfer is for too long with a low molecular weight target |
|
|
|
Reagents may have deteriorated due to meeting use by dates or improper storage conditions |
|
|
|
Incorrect species of secondary antibody |
|
|
|
Buffers are contaminated by bacteria |
|
|
|
Exposure time too short |
|
|
|
Antibody concentration is too low |
|
|
|
High background |
Contaminated blocking buffer |
|
|
Too high antibody concentration |
|
|
|
Insufficient washing |
|
|
|
Too long exposure |
|
|
|
Antibody has lost specificity due to improper storage |
|
|
|
Buffers are contaminated by bacteria |
|
|
|
Smears on blot |
Blot contamination from touching membrane |
|
|
Uneven incubations |
|
|
|
Parts of membrane dried out |
|
|
|
Black spots on blot |
Antibodies binding to clumped blocking reagent or blocking reagent clumped to membrane |
|
|
Aggregated secondary antibody |
|
|
|
Acrylamide gel stuck to membrane |
|
|
|
Smile shaped bands |
Electrophoresis voltage was too high |
|
|
Unevenly run bands |
Poor acrylamide polymerisation |
|
|
Blurry bands |
Electrophoresis voltage was too high |
|
|
White centred bands (ECL detection) |
Rate of reaction was too high and ECL has been depleted |
|
|
Extra bands |
Target protein has multiple splice variants or isoforms |
|
|
Target protein has been subject to proteolytic cleavage |
|
|
|
Antibody epitope is present in another protein |
|
|
|
Secondary antibody concentration too high |
|
|
|
Native IgGs present within samples detected by secondary |
|
|
|
Contaminant IgGs within primary antibody reacted with non-specific proteins |
|
|
|
Incomplete blocking of membrane |
|
|
|
Target is at lower MW than expected |
Target protein has been subject to proteolytic cleavage |
|
|
Target protein has been subject to proteolytic cleavage |
|
|
|
Antibody epitope is present in another protein |
|
|
|
Target is at a higher MW than expected |
Target protein may have been subject to post-translational modifications such as glycosylation |
|
|
Target protein may have formed dimers or multimers |
|
8. Further reading
Bell, 2016. Quantifying western blots: none more black. BMC Biology; 114: 116
Gassmann et al, 2009. Quantifying Western blots: Pitfalls of densitometry. Electrophoresis 2009; 30: 1845-1855
Pillai-Kastoori et al, 2020. A systematic approach to quantitative Western blot analysis. Analytical Biochemistry; 593: 113608