

Immunohistochemistry (IHC) Protocol
This step by step protocol provides everything you need to carry out successful immunohistochemistry. Written by our PhD qualified expert antibody team, this simple to follow IHC protocol includes advice for planning your IHC, equipment, consumables, tissue and image preparation, as well as recipes for all the solutions you will need, and a troubleshooting guide.
Contents

1. Introduction
Immunohistochemistry is an extremely popular and powerful technique that allows the visualisation of protein markers within thin sections of tissue. This can be used to analyse the distribution of receptors, look at the cellular makeup, expression of biomarkers and gross-morphology of a tissue amongst a myriad of other applications. Figure 1 shows some representative images that have been achieved using these protocols. The protocols within this guide are intended for frozen and fixed sections only and are not aimed to cover paraffin embedded sections although many of the stages will be similar. For paraffin embedded IHC please check out our protocol.
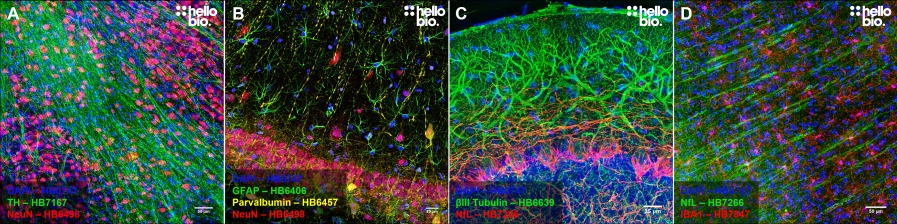
Figure 1. Representative immunohistochemistry images. A. Tyrosine hydroxylase (HB7167) and NeuN (HB6498) staining in rat midbrain. B. GFAP (HB6406), NeuN (HB6498) and Parvalbumin (HB6457) staining for astrocytes, neurons and interneurons respectively in rat hippocampal CA1. C. Purkinje neurons in the cerebellum stained for β3-tubulin (HB6639) and Neurofilament L (HB7266). D. Microglia in the cortex stained for IBA1 (HB7847) alongside neurons stained for neurofilament L (HB7266).
2. Key Decisions
There are a few key decisions that need to be considered before starting any immunohistochemistry experiment. Some of these key decisions include:
- Whether to use a free-floating or slide mounted protocol (see section 2.1)
- Whether to include an isotype control (see section 2.2)
- Whether to use fluorescent or chromogenic mediated detection (see our stand-alone guide on choosing the correct secondary antibody )
If using fluorescent mediated detection then the choice of correct fluorophores is crucial. A brief overview is available in section 2.3 and more detail is available in the previously mentioned guide. - What the best way is to prepare the tissue with regards to fixation, section thickness and cutting technique (see section 4)
- Whether it is necessary to use an antigen retrieval technique (see section 5.2)
- Whether additional steps are necessary to account for using tissue from the same species as the primary antibody (see section 5.3)
2.1 Free-floating and slide mounted immunohistochemistry
There are two primary methodologies in immunohistochemistry:-
- Slide mounted: Sections are cut straight from the cryostat onto microscope slides and all staining occurs directly on the slide.
- Free-floating Sections are kept in buffer after slicing then all staining occurs with the sections floating in an excess of buffer. Sections then need mounting at the end of the protocol.
Both techniques have their own distinct set of advantages and disadvantages which are detailed in table 1.
|
Method |
Advantages |
Disadvantages |
|
Free floating |
|
|
|
Slide mounted |
|
|
Table 1. Some advantages and disadvantages of slide mounted and free-floating immunohistochemistry techniques.
2.2 Choosing an isotype control
2.2.1 What are isotype controls?
Isotype controls are antibodies with no antigen specificity which are used in immunochemical experiments to control for non-specific interactions between antibodies and the sample. They are most commonly used in flow cytometry, immunohistochemistry and immunocytochemistry experiments where they are particularly useful due to the often high background staining levels. Background staining can be caused by many factors including:
- Binding of antibodies to Fc receptors on target cells. For example some antibodies (e.g. mouse IgG2a) bind to Fc receptors on human leukocytes independently of the primary antibody – antigen interaction.
- Cellular autofluorescence. Some cells and cellular structures contain either proteins or chemicals which naturally fluoresce and this can lead to background staining.
- Non-specific antibody interactions. The primary antibody may bind to non-intended targets meaning that the isotype control can be key in determining if this has occurred.
2.2.2 Choosing the right isotype control
When choosing an isotype control it is important to bear in mind:
- The host species should be the same as that of the primary antibody
- The isotype (e.g. IgG2a, IgG1) should be the same as the primary antibody
- The isotype control should have the same modifications as the primary antibody (e.g. if the primary is biotinylated so should the isotype control).
2.1.3 Using Isotype controls
When isotype controls are included in an experiment they should always be used at the same concentration as the primary and following an identical protocol. Ideally the isotype control should generate minimal staining, indicating that there is minimal background staining. However this does not prove that the primary antibody is binding specifically!
2.3 Choosing secondary antibody fluorophores
It is important to choose secondary antibodies that have conjugated fluorophores that are sufficiently separated from each other in excitation/emission wavelengths. If there is too much overlap between spectra then each channel can bleed into each other meaning that it isn’t possible to determine which signal comes from which antibody. In order to determine the best fluorophores to use:
1. Determine the compatibility of the microscope system you are planning on using with available fluorophores. Widefield microscopes will commonly be fitted with filter sets which are only compatible with limited numbers of fluorophores. Confocal microscopes are able to use a much wider range of fluorophores but will still be limited by the wavelengths of the installed lasers.
2. Use a spectral viewer tool (e.g. FPbase Spectraviewer) to check compatibility between various fluorophores.
a. A preference should be towards using standard combinations e.g. DAPI and a fluorophore emitting in the green spectrum (e.g. Alexa Fluor 488, Dylight 488, Janelia Fluor 488, GFP).
b. Make sure there is sufficient spacing between fluorophores such that there is no bleeding between channels.
3. Choose fluorophores that are as bright as possible with high resistance to photobleaching.
3. Equipment & consumables
Assuming a base level of standard laboratory equipment (e.g. pipettes, de-ionised water system, measuring cylinders etc) the specific equipment and consumables you will require for immunohistochemistry are detailed by stage within this section.
3.1 Tissue preparation
|
Equipment |
Consumables |
|
Cryostat / freezing microtome / other cutting equipment |
Isopentane (for freezing fresh tissue) |
|
Dissection tools |
4% paraformaldehyde (PFA) |
|
|
Phosphate buffer (PB) |
|
|
30% sucrose in PBS |
|
|
Optimal cutting temperature (OCT) compound |
3.2 Antigen retrieval
|
Equipment |
Consumables |
|
Water bath |
Citrate buffer (for heat mediated retrieval) |
|
|
Trypsin retrieval buffer (for enzymatic retrieval) |
3.3 Free floating (fluorescence detection)
|
Equipment |
Consumables |
|
Cold room |
Antibodies |
|
Paintbrushes |
Blocking solution |
|
Rocker |
Glycine |
|
Subbed microscope slides |
NaBH4 |
|
Fluorescence microscope |
PBS-Triton |
|
|
Mounting media |
|
|
|
|
|
Antibody solution |
|
|
Nail varnish |
Although not necessary, using nets to hold sections that fit into multi-well plates can hugely speed up the protocol although these do require higher solution volumes.
3.4 Free floating (chromogenic detection)
Although not necessary, using nets to hold sections that fit into multi-well plates can hugely speed up the protocol although these do require higher solution volumes.
|
Equipment |
Consumables |
|
Cold room |
Antibodies |
|
Paintbrushes |
Blocking solution |
|
Rocker |
H2O2 (for HRP conjugated secondaries) |
|
Subbed microscope slides |
Levamisole (for AP conjugated secondaries) |
|
Microscope |
PBS-Triton |
|
|
Mounting media |
|
|
Counterstain (optional) |
|
|
Antibody solution |
|
|
Nail varnish |
|
|
Developer solutions |
3.5 Slide Mounted (fluorescence detection)
|
Equipment |
Consumables |
|
Humidifying chamber |
Hydrophobic pen |
|
Cold room |
PBS-Triton |
|
Subbed microscope slides |
Serum (same species as secondary antibody) |
|
Fluorescence microscope |
Antibodies |
|
|
|
|
|
Mounting media |
|
|
Nail varnish |
3.6 Slide Mounted (Chromogenic detection)
|
Equipment |
Consumables |
|
Humidifying chamber |
Hydrophobic pen |
|
Cold room |
PBS-Triton |
|
Subbed microscope slides |
Serum (same species as secondary antibody) |
|
Microscope |
Antibodies |
|
|
Mounting media |
|
|
Nail varnish |
|
|
Developer solutions |
|
|
H2O2 (for HRP conjugated secondaries) |
|
|
Levamisole (for AP conjugated secondaries) |
|
|
Counterstain (optional) |
4. Tissue Preparation
High quality tissue preparation is absolutely essential for high quality immunohistochemistry results therefore it is always worth taking the time to make sure this is done to the highest possible standard to avoid disappointing results. Dependent upon the experimental requirements tissue may need to be used fresh or fixed.
4.1 Freezing tissue for later processing
It is sometimes necessary to freeze tissue before further processing or subsequent fixation. If not frozen properly this can create ice-crystals which damage cellular structures. By freezing properly this will maintain the quality of tissue to maximise the chance of successful immunostaining.
1. Pre-chill a beaker of isopentane (at least 500ml in a long beaker) to between -42°C and -45°C in a -80°C or using dry ice. Monitor the temperature regularly to ensure the temperature stays within this range.
2. Dissect the tissue using clean tools on ice.
3. Place tissue onto aluminium foil and remove excess liquid using filter paper.
4. Gently immerge the tissue (without aluminium foil) into the isopentane. The time taken to freeze depends upon tissue sample size but it takes around 5 minutes to freezer an adult rat brain.
5. Pre-chill the tips of forceps before removing the tissue from isopentane. Place the frozen tissue in pre-chilled tubes containing soft paper towels.
6. Store at -80°C until subsequent use.
4.2 Perfusion fixation
Generally the best quality tissue sections are achieved when the animal has been perfusion-fixed. This process involved replacing the blood and it’s high autofluorescence with first buffer then fixative. Before attempting make sure this is covered under your regulatory regime and obtain training from an experienced practitioner. A general protocol for rodents is:
1. Overdose with anaesthetic by an appropriate route until the animal has no toe pinch and blink reflexes but the heart is still beating.
2. Open the ribcage to reveal the heart, snip the right atrium. Place a needle into the left ventricle and perfuse through ice-cold PBS (≈200ml for a rat, ≈15ml for a mouse) followed by a similar volume of 4% paraformaldehyde in PBS.
3. Remove the brain / other organs and place into a vial of 4% paraformaldehyde for 24hrs at 4°C.
4. Move the tissue into 30% sucrose in PBS at 4°C until the tissue has sunken to the bottom of the vial
Please see Gage et al., 2012 J. Vis. Exp. (65), e3564 for a detailed protocol with accompanying video.
4.3 Immersion fixation
For small volumes of tissue it is often sufficient to incubate the tissue in fixative as opposed to using perfusion fixation. This will however lead to higher background as blood is not removed from small capillaries.
1. Dissect the tissue with clean tools on ice.
2. Wash briefly with ice-cold PBS
3. Place tissue into 4% paraformaldehyde in PBS for 24hrs at 4°C
4. Move the tissue into 30% sucrose in PBS at 4°C until the tissue has sunken to the bottom of the vial
4.4 Sectioning
Sections can be cut on an array of machines with the most common being cryostats and freezing microtomes. The choice of machine will be partially dictated by availability and partially by how thick sections need to be cut. Check that the specifications of the machines available match with the section thickness required.
Sections can either be cut directly onto the microscope slide in the case of slide-mounted immunohistochemistry or cut into PBS for free-floating immunohistochemistry.
Following cutting, sections can be frozen for processing at a later date:
- Slide mounted: After allowing the sections to dry then sections can be stored at -20°C to -80°C for up to a year
- Free-floating Transfer sections to cryoprotectant and then store at -20°C for up to a year.
5. Immunohistochemistry Protocols
5.1 Safety
Many of the chemicals used in immunocytochemistry have dangerous properties and can cause serious harm if not handled correctly. Always follow local rules and read the full COSHH document for any chemical that you have not used previously. Always wear appropriate PPE such as a lab coat and gloves.
Specifically highlighted hazards:
- Formaldehyde is a highly toxic poison, skin sensitizer and carcinogen and should only ever be used in a fume hood with full PPE.
- Sodium borohydride is toxic, causes severe skin burns and eye damage in addition to reacting rigorously with H2O to create flammable gas which can ignite spontaneously.
5.2 Antigen retrieval
Antigen retrieval can be essential for the successful recognition of antigens by the primary antibody. During fixation by aldehydes, cross-links form between proteins which may hinder access to or directly modify the epitope bound to by the primary antibody. Two key methods are used for antigen retrieval: heat based method and enzyme based methods. Antigen retrieval can be challenging to get right and often requires attempting multiple methods before optimising based upon what is working best.
5.2.1 Heat mediated antigen retrieval
There are multiple protocols available using different buffers and steps. This is one that is well adapted to both free-floating and slide mounted sections and should be a first step.
1. Wash sections three times for 5 minutes in 0.1M PB
2. Transfer sections to citrate antigen retrieval buffer (10mM, pH8.5) that has been preheated to 80°C in a water bath and incubate for 30 minutes
3. Allow sections to cool to room temperature, remaining within the antigen retrieval buffer
4. Wash sections three times for 5 minutes in 0.1M PB
5. Continue into blocking.
5.2.2 Enzymatic antigen retrieval
There are many different enzymatic antigen retrieval protocols available using a range of proteases such as trypsin, pepsin and proteinase k amongst others. Enzymatic retrieval needs to be carried out carefully as it is easy to cause tissue damage by over-digestion of the section. Careful optimisation of incubation conditions and protease concentration is required for successful retrieval. This protocol is a good base to build upon:
1. Make a fresh trypsin retrieval buffer then heat to 37°C in a water bath.
2. Incubate sections for 10-20 minutes in the warmed trypsin solution in a water bath with gentle agitation.
3. Wash sections three times for 5 minutes in PBS-Triton
5.3 Using tissue from the same species the primary antibodies were raised in
Using primary antibodies from the same species as the tissue section can be extremely challenging. The primary antibody will readily bind to Fc receptors present in cells within the tissue while the secondary antibody will bind to endogenous antibodies that are present within the tissue section. This can lead to high background alongside non-specific staining. Resolving these issues can be challenging and two suggestions are described below.
1. Introduce an additional blocking step utilising a Fab fragment anti-mouse IgG antibody to bind to endogenous IgG antibodies.
2. Create an antibody complex by incubating the primary antibody and secondary antibody together separately before then adding mouse serum. After further incubation this can then be added to the tissue. This ensures that any secondary antibody not bound by primary is then sequestered by the mouse serum. See Goodpaster and Randolph-Habecker., 2014. J Histochem&Cytochem 62(3):197-204 for more details.
5.4 Free Floating Protocol (Fluorescent detection)
This protocol has been designed for use with sectioned brain tissue that has been fixed with 4% paraformaldehyde. We use 40µm sections cut on a freezing microtome although use of thinner and thicker sections is possible. Tissue sections should be placed immediately into PBS following sectioning for free-floating immunohistochemistry. For membrane bounds targets with extracellularly targeted antibodies the wash buffer should be swapped from PBS-Triton to PBS.
1. Wash sections three times with PBS-Triton for 5 minutes per wash
2. Incubate sections in 1% NaBH4 for 30 minutes in PBS-Triton.
a. Make up fresh as degrades rapidly
3. Wash sections three times with PBS-Triton for 5 minutes per wash
4. Incubate sections for 30 minutes in 0.05M glycine in PBS-Triton
5. Wash sections three times with PBS-Triton for 5 minutes per wash
6. Incubate sections in blocking solution for 2 hours at room temperature.
7. Incubate sections in primary antibody diluted into antibody solution overnight at 4ºC.
a. If multiplexing is being carried out add all antibodies at the same time but ensure they are raised in different species.
8. Wash sections three times with PBS-Triton for 5 minutes per wash
From now onwards all steps should be done in the dark to avoid bleaching of fluorophores conjugated to the secondary antibody.
9. Incubate sections with secondary antibody diluted into antibody solution for 2 hours at room temperature.
a. For multiplexing add all secondary antibodies at the same time but make sure they use different fluorophores.
10. Incubate slices with 1µg/ml DAPI for 5 minutes in PBS-Triton.
11. Wash sections three times with PBS-Triton for 5 minutes per wash
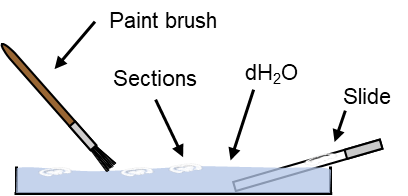
12. Fill a wide petri dish with dH2O. One well at a time transfer sections to the petri dish with a paintbrush then use the paint brush to float each section in turn onto a microscope slide lowered into the petri dish. Mount closest to the frosted section first then one in place slowly pull the slide out of the dH2O to add the next layer of sections.
a. A slide should fit around 6 coronal rat brain sections or 8 coronal mouse brain sections.
13. Once a full slide has been mounted allow the sections to air dry until slightly moist
Note: It can often be helpful to use a paper towel to remove excess moisture from the slide to speed drying.
14. Add a drop or two of mounting medium to each slide (when dry enough) then slowly lower the coverslip over the slide taking care to avoid bubbles.
a. If using a hard-set mounting medium then no sealing is necessary but if not then use clear nail varnish to seal the edges of the coverslip to stop the sample drying out.
15. Allow the mounting medium to dry then store the slides at 4ºC in the dark until ready to image.
5.5 Free Floating Protocol (Chromogenic detection)
This protocol has been designed for use with sectioned brain tissue that has been fixed with 4% paraformaldehyde. We use 40µm sections cut on a freezing microtome although use of thinner and thicker sections is possible. Tissue sections should be placed immediately into PBS following sectioning for free-floating immunohistochemistry. For membrane bounds targets with extracellularly targeted antibodies the wash buffer should be swapped from PBS-Triton to PBS.
1. Wash sections three times with PBS-Triton for 5 minutes per wash
2. Incubate sections in blocking solution for 2 hours at room temperature.
3. Incubate sections in primary antibody diluted into antibody solution overnight at 4ºC.
4. Wash sections three times with PBS-Triton for 5 minutes per wash
5. If using a HRP conjugated antibody, incubate sections in 0.3% hydrogen peroxide for 15 minutes.
Note: If endogenous peroxidase activity is still high then the H2O2 concentration can be increased up to 3%
6. Incubate sections with secondary antibody diluted into antibody solution for 2 hours at room temperature.
7. Wash sections three times with PBS-Triton for 5 minutes per wash
8. Incubate with detection solution following the manufacturer instructions. For Alkaline phosphatase conjugated secondary antibodies consider adding 1mM levamisole to the detection solution to inhibit endogenous phosphatases.
9. Wash sections three times with PBS-Triton for 5 minutes per wash to quench chromogen reaction.
10. Optional: Use a counterstain such as haematoxylin to visualise nuclei following manufacturer instructions.
11. Fill a wide petri dish with dH2O. One well at a time transfer sections to the petri dish with a paintbrush then use the paint brush to float each section in turn onto a microscope slide lowered into the petri dish. Mount closest to the frosted section first then one in place slowly pull the slide out of the dH2O to add the next layer of sections.
a. A slide should fit around 6 coronal rat brain sections or 8 coronal mouse brain sections.
12. Once a full slide has been mounted allow the sections to air dry until slightly moist
a. It can often be helpful to use a paper towel to remove excess moisture from the slide to speed drying.
13. Add a drop or two of mounting medium to each slide (when dry enough) then slowly lower the coverslip over the slide taking care to avoid bubbles.
a. If using a hard-set mounting medium then no sealing is necessary but if not then use clear nail varnish to seal the edges of the coverslip to stop the sample drying out.
14. Allow the mounting medium to dry then store the slides at 4ºC until ready to image.
5.6 Slide Mounted Protocol (Fluorescent detection)
This protocol has been designed for use with sectioned brain tissue that has been fixed with 4% paraformaldehyde however is compatible with frozen sections too. Sections should be placed immediately onto microscope slides following sectioning for slide mounted immunohistochemistry.
1. Use a hydrophobic pen to draw round each section on the slide to prevent cross-contamination of liquids between sections.
2. Optional: use an antigen retrieval method (see section 4.2)
3. Wash sections 4 times for 10 minutes with PBS-Triton
4. Incubate sections with blocking solution in PBS-Triton for 30 minutes.
a. The serum should be of the same species that the secondary antibody was raised in
5. Incubate sections in primary antibody diluted in antibody solution in PBS-Triton overnight at 4°C in a humidifying chamber.
a. The antibody concentration will often need adjusting compared to when using a free-floating methodology. Generally a higher concentration will be needed.
6. Wash sections 3 times for 10 minutes with PBS-Triton
From now onwards all steps should be done in the dark to avoid bleaching of fluorophores conjugated to the secondary antibody.
7. Incubate sections with secondary antibody diluted in antibody solution in PBS-Triton for 2 hours
8. Wash sections 3 times for 10 minutes with PBS
9. Incubate sections in 1µg/ml DAPI in PBS for 5 minutes.
10. Wash sections once in PBS then once with dH2O.
11. Air dry sections for 10 minutes until excess fluid has been removed but the sections remain moist.
12. Add a drop or two of mounting medium to each slide (when dry enough) then slowly lower the coverslip over the slide taking care to avoid bubbles.
a. If using a hard-set mounting medium then no sealing is necessary but if not then use clear nail varnish to seal the edges of the coverslip to stop the sample drying out.
13. Allow the mounting medium to dry then store the slides at 4ºC in the dark until ready to image.
5.7 Slide Mounted Protocol (Chromogenic detection)
This protocol has been designed for use with sectioned brain tissue that has been fixed with 4% paraformaldehyde however is compatible with frozen sections too. Sections should be placed immediately onto microscope slides following sectioning for slide mounted immunohistochemistry.
1. Wash sections three times with PBS-Triton for 5 minutes per wash
2. Incubate sections in blocking solution for 2 hours at room temperature.
3. Incubate sections in primary antibody diluted into antibody solution overnight at 4ºC.
4. Wash sections three times with PBS-Triton for 5 minutes per wash
5. If using a HRP conjugated antibody, incubate sections in 0.3% hydrogen peroxide for 15 minutes.
a. Note: If endogenous peroxidase activity is still high then the H2O2 concentration can be increased up to 3%
6. Incubate sections with secondary antibody diluted into antibody solution for 2 hours at room temperature.
7. Wash sections three times with PBS-Triton for 5 minutes per wash
8. Incubate with detection solution following the manufacturer instructions. For Alkaline phosphatase conjugated secondary antibodies consider adding 1mM levamisole to the detection solution to inhibit endogenous phosphatases.
9. Wash sections three times with PBS-Triton for 5 minutes per wash to quench chromogen reaction.
10. Optional: Use a counterstain such as haematoxylin to visualise nuclei following manufacturer instructions.
11. Allow the sections to air dry until slightly moist
a. It can often be helpful to use a paper towel to remove excess moisture from the slide to speed drying.
12. Add a drop or two of mounting medium to each slide (when dry enough) then slowly lower the coverslip over the slide taking care to avoid bubbles.
a. If using a hard-set mounting medium then no sealing is necessary but if not then use clear nail varnish to seal the edges of the coverslip to stop the sample drying out.
13. Allow the mounting medium to dry then store the slides at 4ºC until ready to image.
6. Image preparation
While images are often captured in proprietary software designed by microscope manufacturers we recommend using the free Fiji edition of ImageJ for further analysis (available at www.imagej.net). While excellent support is available (see www.imagej.net/learn), particular features to highlight for immunohistochemistry analysis includes the ability to:
- Remove background signal from images. Go to Process -> Subtract background
- Count cells either by hand or automatically (see this helpful guide)
- Calculate the area of part of the image. Use the drawing tools to make a shape then go to Analyse -> Measure.
- Where a Z-stack has been captured ImageJ is able to both Z project (Image -> Stacks -> Z-project) and 3D project (Image -> Stacks -> 3D project) the stack to maximise the information gained from the Z-stack.
When exporting images make sure to always save at as higher quality as possible using a .tif format. Avoid using formats such as .gif, .png or .jpeg as these can compress the image therefore losing potentially important details.
7. Solutions
10x PBS
Notes:
- Store at room temperature
- If using PBS tablets then add 1/10 of the dH2O specified by the manufacturer to make a 10x solution
| Reagent | Amount to Add | Final concentration | ||
| 500ml | 1000ml | 2000ml | ||
| NaCl | 40g | 80g | 160g | 1.37M |
| KCl | 1g | 2g | 4g | 27mM |
| Na2HPO4 | 7.2g | 14.4g | 28.8g | 100mM |
| KH2PO4 | 1.2g | 2.4g | 4.8g | 20mM |
| dH2O | ≈400ml | ≈800ml | ≈1600ml | - |
| Conc HCl | Adjust to pH 7.4 | - | ||
| dH2O | Make up to final volume required | - | ||
10x TBS
Note: store at room temperature
|
Reagent |
Amount to add |
Final concentration |
||
|
500ml |
1000ml |
2000ml |
||
|
NaCl |
40g |
80g |
160g |
1.37M |
|
Tris-base |
12.1g |
24.2g |
48.5g |
200mM |
|
dH2O |
≈400ml |
≈800ml |
≈1600ml |
- |
|
Conc HCl |
Adjust to pH 7.4 |
- |
||
|
dH2O |
Make up to final volume required |
- |
||
1x PBS-Triton / TBS Triton
Notes:
- Triton X-100 is extremely viscous therefore it is often helpful to cut the end off the pipette tip using scissors to made pipetting easier.
- The solution will need a good mixing with a stirring bar before being ready to use
- Generally make up fresh and don’t keep for longer than a few days.
- If staining for membrane bound proteins with an extracellular epitope consider omitting the Triton X-100. If over-permeabilisation is suspected then consider reducing the Triton X-100 concentration to 0.1% or substitute for 0.1% Tween-20
|
Reagent |
Amount to add |
Final concentration |
||
|
500ml |
1000ml |
2000ml |
||
|
10x TBS / PBS |
50ml |
100ml |
200ml |
1x |
|
dH2O |
450ml |
900ml |
1800ml |
- |
|
Triton X-100 |
1.5ml |
3ml |
6ml |
0.3% |
Cryoprotectant
Note: Ensure all sucrose is dissolved before adjusting to final volume.
|
Reagent |
Amount to add |
Final concentration |
||
|
250ml |
500ml |
1000ml |
||
|
Sucrose |
75g |
150g |
300g |
30% |
|
0.1M Phosphate buffer |
100ml |
200ml |
400ml |
40mM |
|
Ethylene glycol |
75ml |
150ml |
300ml |
30% |
|
0.1M Phosphate buffer |
Make up to final volume required |
- |
||
0.1M PB
Note: store at room temperature and make up fresh
|
Reagent |
Amount to add |
Final concentration |
||
|
500ml |
1000ml |
2000ml |
||
|
Na2HPO4 |
5.45g |
10.9g |
21.8g |
76.8mM |
|
NaH2PO4 |
1.6g |
3.2g |
6.4g |
26.7mM |
|
dH2O |
≈400ml |
≈800ml |
≈1600ml |
- |
|
Conc HCl |
Adjust to pH 7.4 |
- |
||
|
dH2O |
Make up to final volume required |
- |
||
4% PFA in PBS
Notes:
- It is possible to buy either paraformaldehyde (PFA) in a powdered for or in a 40% solution. It is generally much easier to use the solution than powder.
- Over time 4% PFA can degrade therefore it is better to use a fresh solution than one that has been stored for a long period of time.
Using PFA Solution
Notes:
- PFA is extremely toxic and a powerful skin irritant, only ever use in a fume hood.
| Reagent | Amount to Add | Final concentration | ||
| 50ml | 100ml | 500ml | ||
| 40% PFA | 5ml | 10ml | 50ml | 4% |
| PBS 4 | 5ml | 90ml | 450ml | - |
| Check pH and adjust to pH 7.4 if necessary | ||||
Using PFA Powder
Notes:
- Powdered PFA is extremely dangerous, only ever weigh out and prepare in a fume hood.
- Powdered PFA is not very soluble in water therefore the solution will require heating with a stirring bar until fully dissolved. This may take up to 3 hours.
- Take extreme caution not to overheat the solution while dissolving to avoid boiling of the solution and do not leave.
| Reagent | Amount to Add | Final concentration | ||
| 50ml | 100ml | 500ml | ||
| PFA | 2g | 4g | 20g | 4% |
| PBS | 50ml | 100ml | 500ml | - |
| Check pH and adjust to pH 7.4 if necessary | ||||
Amount to Add Reagent 50ml 100ml 500ml Final concentratioINSERT
DAPI staining solution
Notes:
- DAPI is normally stored as a 1mg/ml stock solution.
- Protect both the stock and working solution from light to avoid bleaching.
- DAPI is a potential mutagen therefore care should be taken to always handle with gloves while wearing correct PPE.
| Reagent | Amount to Add | |||||
| 10ml | 20ml | 50ml | 100ml | 500ml | Final Concentration | |
| 1mg/ml DAPI (available as HB8199) |
10µl | 20µl | 50µl | 100µl | 500µl | 1µg/ml |
| PBS (available as HB5330) |
10ml | 20ml | 50ml | 100ml | 500ml | - |
Citrate antigen retrieval buffer
Note: Can be stored at room temperature for 2-3 months or longer at 4°C.
|
Reagent |
Amount to add |
Final concentration |
||
|
100ml |
500ml |
1000ml |
||
|
Tri-sodium citrate |
0.294g |
1.47g |
2.94g |
10mM |
|
dH2O |
≈80ml |
≈400ml |
≈800ml |
- |
|
Conc HCl or conc NaOH |
Adjust to pH 8.5 |
- |
||
|
dH2O |
Make up to final volume required |
- |
||
Trypsin antigen retrieval buffer
Notes:
- Make up from freshly thawed trypsin stock to avoid degradation of the trypsin enzyme
|
Reagent |
Amount to add |
Final concentration |
||
|
5ml |
10ml |
50ml |
||
|
0.5% Trypsin |
0.5ml |
1ml |
5ml |
0.05% |
|
1% CaCl2 |
0.5ml |
1ml |
5ml |
0.1% |
|
dH2O |
3ml |
6ml |
30ml |
- |
|
Conc NaOH |
Adjust to pH 7.8 |
- |
||
|
dH2O |
Make up to final volume required |
- |
||
1% Sodium borohydride
Notes:
- Make up fresh immediately before use
- Use in a well ventilated area away from any sources of ignition as NaBH4 releases hydrogen gas when dissolved in water.
|
Reagent |
Amount to add |
Final concentration |
||
|
5ml |
10ml |
50ml |
||
|
Tri-sodium citrate |
0.05g |
0.1g |
0.5g |
264mM |
|
dH2O |
Make up to final volume required |
- |
||
0.05M Glycine
Note: Make up fresh as will rapidly suffer from microbial growth
|
Reagent |
Amount to add |
Final concentration |
||
|
5ml |
10ml |
50ml |
||
|
Glycine |
18.7mg |
37.5mg |
187.7mg |
0.05M |
|
dH2O |
Make up to final volume required |
- |
||
Blocking solution
Notes:
- Make up fresh immediately before use
- Blocking solutions can sometimes require a bit of optimisation to get perfect results therefore this recipe may need adjusting or replacing for an alternative. Increasing the concentration of serum would be the suggested first thing to change if there are struggles with high background.
- Use serum from the same species as that the secondary antibody was raised in.
|
Reagent |
Amount to add |
Final concentration |
||
|
5ml |
10ml |
50ml |
||
|
BSA |
0.1g |
0.2g |
1g |
2% |
|
Serum (from secondary host species) |
0.15ml |
0.3ml |
1.5ml |
3% |
|
PBS-Triton |
4.85ml |
9.7ml |
48.5ml |
- |
Antibody solution
Notes:
- Make up fresh immediately before use
- Use serum from the same species as that the secondary antibody was raised in.
|
Reagent |
Amount to add |
Final concentration |
||
|
5ml |
10ml |
50ml |
||
|
Serum (from secondary host species) |
0.15ml |
0.3ml |
1.5ml |
3% |
|
PBS-Triton |
4.85ml |
9.7ml |
48.5ml |
- |
8. Troubleshooting
Immunohistochemistry is a long multi-step process with many things that can go wrong and numerous factors that should be considered for a successful experiment. At some point it is inevitable that something will go wrong or not be optimal. Below are compiled some of the most common pitfalls that can cause sub-optimal immunohistochemistry results.
|
Problem |
Potential cause |
Suggested solutions |
|
|
Weak or no staining
|
Too low antibody concentration |
|
|
|
Antibody incompatibility |
|
||
|
High background is obscuring signal |
|
||
|
Membrane damaged by permeabilisation reagents |
|
||
|
Antibody is not suitable for IHC |
|
||
|
Low abundance of target protein |
|
||
|
Fixation may be obscuring the target epitope |
|
||
|
Poor antibody penetration into tissue section |
|
||
|
Insufficient permeabilisation |
|
||
|
Incompatible secondary fluorophores used with detection system |
|
||
|
Degradation of fluorophore following mounting |
|
||
|
Degraded buffers |
|
||
|
Degraded primary antibody |
|
||
|
Damaged fluorophore conjugated secondaries due to light bleaching |
|
||
|
Incompatible buffers |
|
||
|
Over-fixation |
|
||
|
Bleed through between channels when multiplexing |
Overlapping fluorophore excitation/emission spectra |
|
|
|
Unsuitable excitation and emission filters on imaging system |
|
||
|
Altered tissue morphology |
Ice damage |
|
|
|
Rough handling of free-floating sections |
|
||
|
Degradation due to poor storage |
|
||
|
Too harsh antigen retrieval |
|
||
|
Frozen sections detach from the slide |
|
||
|
Incomplete fixation |
|
||
|
High background or non-specific staining
|
Auto fluorescent molecules in tissue section |
|
|
|
Non-specific secondary binding |
|
||
|
Too high primary antibody concentration |
|
||
|
Too high secondary antibody concentration |
|
||
|
Insufficient purification of antibodies |
|
||
|
Insufficient blocking |
|
||
|
Insufficient washing |
|
||
|
Primary antibody is from the same species as the tissue sections. |
|
||
|
Endogenous enzyme activity (for chromogenic detection) |
For HRP conjugated secondaries use 0.3% H2O2 for 10-15 minutes. If blocking is not successful at this concentration consider increasing to 3%. For AP conjugated secondaries use 2mM levamisole.
|
||
|
Sections have dried out |
|
||
|
Too much substrate (for chromogenic detection) |
|
||
|
Too high signal amplification (if using biotinylated secondary antibodies) |
|
||
|
Thickness of tissue section |
|
||
9. Further Reading
- German CL, Gudheti MV, Fleckenstein AE, Jorgensen EM. Brain Slice Staining and Preparation for Three-Dimensional Super-Resolution Microscopy. Methods Mol Biol. 2017;1663:153-162. doi:10.1007/978-1-4939-7265-4_13
- Goodpaster, T., & Randolph-Habecker, J. (2014). A flexible mouse-on-mouse immunohistochemical staining technique adaptable to biotin-free reagents, immunofluorescence, and multiple antibody staining. The journal of histochemistry and cytochemistry : official journal of the Histochemistry Society, 62(3), 197–204. doi:10.1369/0022155413511620
- Duraiyan J, Govindarajan R, Kaliyappan K, Palanisamy M. Applications of immunohistochemistry. J Pharm Bioallied Sci. 2012;4(Suppl 2):S307-S309. doi:10.4103/0975-7406.100281
- Goldstein, N. S., Hewitt, S. M., Taylor, C. R., Yaziji, H., Hicks, D. G., & Members of Ad-Hoc Committee On Immunohistochemistry Standardization (2007). Recommendations for improved standardization of immunohistochemistry. Applied immunohistochemistry & molecular morphology : AIMM, 15(2), 124–133. doi:10.1097/PAI.0b013e31804c7283
- Hewitt SM, Baskin DG, Frevert CW, Stahl WL, Rosa-Molinar E. Controls for Immunohistochemistry: The Histochemical Society’s Standards of Practice for Validation of Immunohistochemical Assays. Journal of Histochemistry & Cytochemistry. 2014;62(10):693-697. doi:10.1369/0022155414545224
- Lujan and Ciruela. Receptor and Ion channel detection in the brain 2nd edition. 2016. Springer Methods: Neuromethods 169. ISSN: 0893-2336
- Maric, D., Jahanipour, J., Li, X.R. et al. Whole-brain tissue mapping toolkit using large-scale highly multiplexed immunofluorescence imaging and deep neural networks. Nat Commun 12, 1550 (2021). Doi:10.1038/s41467-021-21735-x
- McNicol, A. M., & Richmond, J. A. (1998). Optimizing immunohistochemistry: antigen retrieval and signal amplification. Histopathology, 32(2), 97–103. Doi:10.1046/j.1365-2559.1998.00342.x
- O'Hurley, Gillian, Sjöstedt, Evelina, Rahman, Arman, Li, Bo, Kampf, Caroline, Pontén, Fredrik, Gallagher, William M., Lindskog, Cecilia, (2014), Garbage in, garbage out: A critical evaluation of strategies used for validation of immunohistochemical biomarkers, Molecular Oncology, 8, doi: 10.1016/j.molonc.2014.03.008.